SAP SD (Sales and Distribution) TUTORIALS
SAP SD ( Sales and Distribution ) is one the largest functional Module in SAP.It handles all the processes from an Order to delivery.The main operations this module handles are Customer Sales Orders processing , pricing, Picking, packing , Shipping, billing and risk management etc.
SAP SD Discussion Forum and Sales/Distribution Tips
Document Flow in Sales
Basic Process of how Packing Works
Accumulate the amount of condition types in accounting document
Add a Field To New Condition Table in Pricing
For example:
Material 4711 costs 150 USD. Some customers receive a discount of 10 USD per 100 pieces.
However, a specific customer can buy the material for 100 USD. Since this is a particularly good price, the customer should not also have a discount of 10 USD per 100 pieces. Therefore, this discount is to be excluded from pricing.
To achieve this, copy the standard pricing to a ZXXXX Pricing.
Define new document pricing procedure in SM30 - V_TVKV for billing.
Assign new document pricing procedures to billing types in SM30 - V_TVFK_PR
Define the Condition Exclusion Groups in OV31.
Assign the Condition type for the Condition Exclusion Groups in OV32.
Assign the Billing Pricing Procedure in VOK8 for the Condition Exclusion Groups.
This is how it should look after modification:
* Header data
* VBRK-xxxxx = ............
* Item data
* VBRP-xxxxx = ............
* Additional split criteria
System response
FI documents have a 3-digit item counter that limits the number of items permitted per document.
If the documents with an excessive number of items come from another application area
(e.g. sales, logistics, order accounting), you can configure the system to the effect that
these documents are summarized in FI. "
SAP SD Discussion Forum and Sales/Distribution Tips
Listed here are practical and helpful SAP SD Stuff to assist those supporting the SAP Sales and Distribution Module. You can find samples of interviews questions, answers and faq as well as many other tips for the SAP SD module. If you have any SAP Sales and Distribution questions, please feel free to raise it in the SAP SD forum.
The Sales and Distribution (SD) application component fulfills many of the international requirements that supports the sales and distribution activities with functions such as pricing and conditions, customer order processing, delivery monitoring, billing, credit and risk management.
Document Flow in Sales
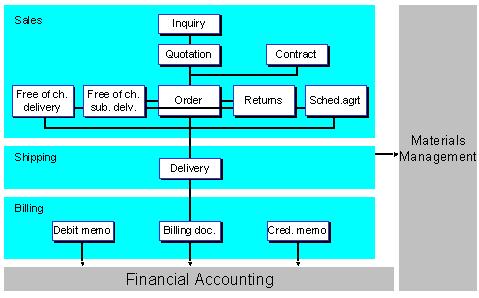
The sales documents you create are individual documents but they can also form part of a chain of inter-related documents. For example, you may record a customer’s telephone inquiry in the system. The customer next requests a quotation, which you then create by referring to the inquiry. The customer later places an order on the basis of the quotation and you create a sales order with reference to the quotation. You ship the goods and bill the customer. After delivery of the goods, the customer claims credit for some damaged goods and you create a free-of-charge delivery with reference to the sales order. The entire chain of documents – the inquiry, the quotation, the sales order, the delivery, the invoice, and the subsequent delivery free of charge – creates a document flow or history. The flow of data from one document into another reduces manual activity and makes problem resolution easier. Inquiry and quotation management in the Sales Information System help you to plan and control your sales.
The following graphic shows how the various types of sales documents are inter-related and how data subsequently flows into shipping and billing documents.
The following graphic shows how the various types of sales documents are inter-related and how data subsequently flows into shipping and billing documents.
Basic Process of how Packing Works
Let's say you want to pack a material shirt_jai in test_pack.
Using MM01, create material type=packaging test_pack
[SPRO]
IMG-Logistics Execution-Shipping-Packing-
Define Packaging Material Types
Let's say JPAC. The settings that I chose:
Plant determ. - Plant is entered manually in handling unit
Pack. matl. cat. - Packaging materials
Generate Dlv. Items - blank
Number assignment - Number range interval 'HU_VEKP'
IMG-Logistics Execution-Shipping-Packing-
Define Packaging Material Types
Let's say JPAC. The settings that I chose:
Plant determ. - Plant is entered manually in handling unit
Pack. matl. cat. - Packaging materials
Generate Dlv. Items - blank
Number assignment - Number range interval 'HU_VEKP'
IMG-Logistics Execution-Shipping-Packing-
Define material group for packaging material
Let's say JGRP
Define material group for packaging material
Let's say JGRP
IMG-Logistics Execution-Shipping-Packing-
Define allowed packaging materials
JGRP - JPAC
Define allowed packaging materials
JGRP - JPAC
MM02: Check settings for the materials
First, test_pack
First, test_pack
Sales:General/Plant -> Matl. Grp. Pack. Matls: JGRP (Note)
Sales:General/Plant -> Packaging Mat. Type: JPAC (Note)
Basic Data 1 -> Material: JMAT
Sales:General/Plant -> Packaging Mat. Type: JPAC (Note)
Basic Data 1 -> Material: JMAT
Then, shirt_jai
Sales:General/Plant -> Matl. Grp. Pack. Matls: JGRP
Sales:General/Plant -> Packaging Mat. Type: -
Basic Data 1 -> Material: JMAT
Sales:General/Plant -> Packaging Mat. Type: -
Basic Data 1 -> Material: JMAT
VL01N Outbound Delivery -> Packing
Enter the materials at top and at bottom
Enter the materials at top and at bottom
The "Packing Process" with an Example
Example:
You created a order for a material(R-1160 - hard disks) for a qty - 120 pieces.
You created a order for a material(R-1160 - hard disks) for a qty - 120 pieces.
You need to create a delivery and
A)pack 40 pieces each of the material are grouped together into larger cardboard boxes (PK-100 - shipping/packing material) and
B)these 3 cardboard boxes are put into pallet (PK-095).
A)pack 40 pieces each of the material are grouped together into larger cardboard boxes (PK-100 - shipping/packing material) and
B)these 3 cardboard boxes are put into pallet (PK-095).
Solution:
A)Packing 40 pieces each of material (40 x 3 = 120 pieces)
A)Packing 40 pieces each of material (40 x 3 = 120 pieces)
1)Goto [VL02N] to change the delivery, you already created.
Or you can do the following steps while you are creating a delivery also.
2)Go to "pack" icon.
3)In the upper section, enter the "packing material" (PK-100)
4)In the lower section, change the "partial quantity" to 40 of material R-1160.
5)Select both the lines of upper section and lower section and click the green ok. It generates a shipping unit/handling unit number.
6)Now, select both lines of upper & lower section & click the button "per part. qty" (New HU per part qty of material)
Check: click "General Overview" icon to see whether it packed 40 pieces of material in 3 cartons.
B)Packing all 3 cartons in one big carton(PK-095)
1) from above screen, click "pack HUs" (pack shipping unit)
2)enter the packaging material (PK-095) in the upper section and select this line.
3)select 3 lines of PK-100 in lower section since you want to pack them in PK-095.
4)selecting both lines, click "pack" icon.
5)Now all the 3 cartons(PK-100 with 40 pieces each of material) are packed in one big carton (PK-095).
Check: "General overview" icon.
Finance
Difference between Condition Type
Please explain the difference between Ek01 ( Actual Cost) and EK02 Calculated Cost.
These are the condition type that will display the results of the unit costing for certain type of sales document.
EK01 :
If you use this condition type, the result of unit costing is issued to the first position on the conditions screen for the item. The value can be used as a basis for price determination.
If you use this condition type, the result of unit costing is issued to the first position on the conditions screen for the item. The value can be used as a basis for price determination.
EK02:
If you use this condition type, the result of unit costing is simply a statistical value which you can compare with the price.
If you use this condition type, the result of unit costing is simply a statistical value which you can compare with the price.
Please note the following points :
1) The condition type must have condition category 'Q' (costing).
2) The condition type must agree with the condition type defined for unit costing in the pricing procedure.
I have a customer who is being offered two discounts ie k007 and k005, now I want to exclude k007 for the next 2
orders or so? I have set the exclusion indicator for the condition type,but still the condition is being accepted when I create a sales order. Am I missing something, how do I do it?
orders or so? I have set the exclusion indicator for the condition type,but still the condition is being accepted when I create a sales order. Am I missing something, how do I do it?
I think u need to change the validity of the condition record for the condition type K007 defining it not valid for that particular 2 months. And also the settings of the Requirements as it is correct that it overrules the exclusion.
Accumulate the amount of condition types in accounting document
To accumulate the amount of condition types in accounting document without affecting the pricing display in billing document.
As an illustration :-
ZPXX 3500
ZDXX 1000-
ZWXX 500-
ZDXX 1000-
ZWXX 500-
(all condition types are shown separately in pricing view)
Journal:
Dr Vendor 2000
Cr Sales 2000 (ZPXX - ZDXX - ZWXX)
Dr Vendor 2000
Cr Sales 2000 (ZPXX - ZDXX - ZWXX)
One way to do it is :-
Mark the condition types you want to group as statistical and remove the account assignment key.
Create a subtotal in your pricing procedure that will add them together and put in the account assignment key for it. This way the individual components will still display on your pricing screen but FI will only get one posting.
Creating New Pricing Procedure
What is the transaction code for creating new pricing procedure and how to attach it to specific plant?
You create PP in spro > Sales and Distribution > Basic Functions > Pricing > Pricing Control > Define and Assign Pricing Procedures > Maintain Pricing Procedures
You can't attach PP to specific plant. Pricing Procedure is determined thru trx OVKK. The defining parameters for pricing procedure determination are:
1. SalesOrg
2. Distribution Channel
3. Division
4. Document Procedure (defined in Sales doc\Billing doc maintenance)
5. Pricing procedure assigned to customer (defined in customer master)
2. Distribution Channel
3. Division
4. Document Procedure (defined in Sales doc\Billing doc maintenance)
5. Pricing procedure assigned to customer (defined in customer master)
Reg pricing procedure.
1. Use transaction code v/07 to create a access sequence and assign tables based on which you want to carry on
pricing as accesses.
pricing as accesses.
2. Use transaction code v/06 to define condition type. It can be for base price, discount, freight etc.,
(Do assign relevant access sequence)
(Do assign relevant access sequence)
3. Use transaction code v/08 to define pricing procedure.
4. Assign this to your relevant sales area+ dpp+cupp.
While specifying requirement, we can give reqt no.22 which specifies that plant has to be set. This is generally done for output taxes since output taxes depend upon the delivering plant. But directly there is no assignment between plant and pricing procedure.
What is "alt cal type" & "alt base value" & "Requirement field" in the Pricing Procedure
Can any one explain exactly what is "alt cal type" & "alt base value" and also " Requirement field" in the pricing procedure?
The alternate base value is used as the calculation basis only, while the alternate calculation is used to modify the final value.
For example, imagine you have a condition type ZZ01, with a condition record maintained (master data) for $100. Now, condition ZZ02 also exists lower in the schema, but with a rate of 10%. The standard calculation would result in a final value of $110.
The alternate base value could say, "don't use $100 as the basis -- use the original price PR00 only, which was $90." Then, the final value would be $100 + (10% of $90) = $109.
The alternate calculation routine says, "ignore the 10% altogether. Instead, use an externally calculated 20%." Then, you end up with a final value of $100 + (20% of $100) = $120.
Put them both together, and you could end up with $100 + (20% of $90) = $118.
Now once again,
Alternative Calculation Type:
Normally if you want to calculate a value you have to use a calculation type for determinating the value. This calculation type is either addition, subtraction or multiplication. Similarly SAP also has got a default calculation type in the control data of the condition type. There you have the options of either Qty based , Fixed Amount Based or Percentage based.
Here what happens is suppose if you define Your condition type that calculates the base price of a material on Qty based. Then the calculation will be done based on the quantity of the material. If the customer orders 10 Nos and you have maintained a unit price of 100 Rs for each material then the value determined is 1000 INR. Similarly if the discount condition type , you maintain the calculation type as %. This means if you maintain the value of 10 % in the condition record. Then this percentage is taken as the calculation type and the condition value is determined.
In some cases you have to forego the default calculation types and use the customer specific method for calculating a value. For ex if you are calculating the Freight charges for a Material . it depends on so many criteria like, the weight, volume and also the minimum amount etc etc, in those cases, you forego the default value and then use the alternative calculation type in calculating the condition value against the particular condition.
Alternative Condition Base value :
If you have to calculate any value then you have to have a base value for it. For ex if you want to calculate the discount of 10 % for a material then you have to have a base value on which this 10% is calculated. Normally you take the condition value of the base price of the material to calculate the value.
Now you don't want to take the base value and take other values as base value which are derived on some formulae. So you create a routine which will do the mathematical operations in the routine and derive you a value which is now used as the base value for calculating the condition value for a particular condition type.
Requirement:
A factor in the condition technique that restricts access to a condition table. The system only accesses a condition table to determine the price if the requirement specified has been met.
A factor in the condition technique that restricts access to a condition table. The system only accesses a condition table to determine the price if the requirement specified has been met.
Example:
The system uses an access sequence to determine the price of a material. One of the accesses in the sequence contains the requirement "in foreign currency." The system only uses the table behind this access if the sales order for which the price must be calculated is in a foreign currency.
Pricing date based on Deliv. date, Sales Ord, Billing
How can I, or am I able to find anything on a way of RE-Pricing be done in a QUOTATION?
You can always 'Update" pricing manually in a quotation the same way you do in a sales order, either in create or change modes. Menu path Edit --> New Pricing or press the 'Update pricing' button on the item conditions tab.
If you are asking how to reprice a quotation when it converts into a sales order, that can be done with the copy controls of the Item Category. IMG: Sales & Dist --> Sales --> --> Maintain Copy Control for Sales Docs --> Sales Doc to Sales Doc (transaction vtaa). Just choose the combination of documents and the respective item category. The field you need to be concerned with is "Pricing type".
However, from a business process perspective it makes absolutely NO sense to reprice a quotation when converting to a sales order. After all, the entire point of using quotations is to firm up details like pricing before creating the sales order.
Quantity Based Discounts in Bulk Quantities Sales
You're looking to implement quantity based discounts in 4.6c. You are trying to sell items in specific bulk quantities, and only give the discount for specific quantity intervals.
For example, if a customer orders 1 piece, 2 pieces, 3, etc. of part ABC, the price is $100.
If the customer orders 10 pieces of part ABC, the price is $50.
However, this is not only a standard minimum quantity discount. If the customer tries to order 11 pieces, 12, 13, etc. it should return $100 again.
The only values for which $50 should apply are 10, 20, 30, etc. - multiples of the bulk quantity 10.
You have discussed changing your part number to reflect a bulk qty of 10, however you have in house consumption that is allowed to consume only 1 part at a time. You would vastly prefer to keep one part number that you order from the supplier, consume internally and ship externally.
You are fairly certain there is basic functionality that covers this, but you're just not sure where to start.
Taking your requirements literally. Standard SAP scale pricing will not do it in that you only want the reduced price to come into effect when the order quantity is multiple of some bulk factor.
It is agreed with that creating a separate material number is not a good idea.
You can try this :-
1. Define/Select a UOM for selling in bulk (i.e. cas, pallet, box whatever)
2. Maintain UOM conversion between your base UOM and this new UOM
3. Configure you bulk pricing condition type by usual means (it should be a base price rather than discount).
4. Place this new bulk price behind your normal "PR00" price in the pricing procedure
5. Create a new condition base value routine via VOFM where you check XKWERT to see if it is a whole number. If it is not then set XKWERT to zero.
6. Assign this new routine to your bulk price condition in your pricing procedure in ALT condition base value column.
7. Maintain bulk price conditon record in the Bulk UOM.
Mass Update of condition pricing
You can update the condition pricing for a range of sales order.
For e.g. if you create sales order for 15 months or so, and at the beginning of each year, you have to update the prices for lots of sales orders.
Other than using VA02 and make an Update of the conditions at item level which is a big work because you will have lots of open sales order after so many months.
Use VA05, select your Orders and on the result screen :-
Make Material Master Price of a material as sales price automatically
The first method is not to set the pricing condition VPRS as statistical.
Simply remove PR00 and it will work fine if you always use VPRS as your pricing base inside the pricing procedure.
VPRS will reads both prices based on the price control in the material master.
Price control S for standard price.
Price control V for moving average price.
Price control V for moving average price.
It is this simple if you do not have any other "Prices" in the price procedure.
However, if you are using one pricing procedure where for some items you price using VPRS and some others using PR00, then you should use requirement routines to enable the correct price condition type at the right time.
The second method involves more work as you need to write a formula (VOFM) to get that information.
This is how it goes :-
1. Set VPRS to be the first step in the pricing procedure and to be subtotal B (as standard).
2. Set PR00 with alt. calc. type formula, which sets the value of PR00 to be equal to the subtotal B.
The routine (created with transaction VOFM) is:
The routine (created with transaction VOFM) is:
RV64A901
FORM FRM_KONDI_WERT_600.
XKWERT = KOMP-WAVWR.
ENDFORM.
FORM FRM_KONDI_WERT_600.
XKWERT = KOMP-WAVWR.
ENDFORM.
The pricing procedure than looks like that:
Step 1 VPRS statistical, subtotal B, reqt 4
Steps to Create Commission for Agent
For creating commission agent, you have to follow below steps.
1) Establish Partner Functions for the Commissionee(s)
Menu Path: TOOLS ->; BUSINESS ENGINEER ->; CUSTOMIZING ->; SALES AND DISTRIBUTION ->; BASIC FUNCTIONS ->; PARTNER DETERMINATION ->; DEFINE PARTNER FUNCTIONS
Transaction Code: VOPA
Menu Path: TOOLS ->; BUSINESS ENGINEER ->; CUSTOMIZING ->; SALES AND DISTRIBUTION ->; BASIC FUNCTIONS ->; PARTNER DETERMINATION ->; DEFINE PARTNER FUNCTIONS
Transaction Code: VOPA
2) Assign the Partner Functions to Partner Procedures
Menu Path: TOOLS ->; BUSINESS ENGINEER ->; CUSTOMIZING ->; SALES AND DISTRIBUTION ->; BASIC FUNCTIONS ->; PARTNER DETERMINATION ->; DEFINE PARTNER FUNCTIONS
Transaction Code: VOPA
Menu Path: TOOLS ->; BUSINESS ENGINEER ->; CUSTOMIZING ->; SALES AND DISTRIBUTION ->; BASIC FUNCTIONS ->; PARTNER DETERMINATION ->; DEFINE PARTNER FUNCTIONS
Transaction Code: VOPA
3) Create a Partner Procedure for the Commissionees
Menu Path: TOOLS ->; BUSINESS ENGINEER ->; CUSTOMIZING ->; SALES AND DISTRIBUTION ->; BASIC FUNCTIONS ->; PARTNER DETERMINATION ->; DEFINE PARTNER FUNCTIONS
Transaction Code: VOPA
Menu Path: TOOLS ->; BUSINESS ENGINEER ->; CUSTOMIZING ->; SALES AND DISTRIBUTION ->; BASIC FUNCTIONS ->; PARTNER DETERMINATION ->; DEFINE PARTNER FUNCTIONS
Transaction Code: VOPA
4) Create New Customer Account Group(s) for Commission Agents
Menu Path: TOOLS ->; BUSINESS ENGINEER ->; CUSTOMIZING ->; LOGISTICS GENERAL ->; LOGISTICS BASIC DATA: BUSINESS PARTNERS ->; CUSTOMERS ->; CONTROL ->; DEFINE ACCOUNT GROUPS AND FIELD SELECTION FOR CUSTOMER
Transaction Code: OVT0
Menu Path: TOOLS ->; BUSINESS ENGINEER ->; CUSTOMIZING ->; LOGISTICS GENERAL ->; LOGISTICS BASIC DATA: BUSINESS PARTNERS ->; CUSTOMERS ->; CONTROL ->; DEFINE ACCOUNT GROUPS AND FIELD SELECTION FOR CUSTOMER
Transaction Code: OVT0
5) Assign the Partner Functions to the Customer Account Group(s)
Menu Path: TOOLS ->; BUSINESS ENGINEER ->; CUSTOMIZING ->; SALES AND DISTRIBUTION ->; BASIC FUNCTIONS ->; PARTNER DETERMINATION ->; DEFINE PARTNER FUNCTIONS ->; GOTO ->; PARTNER FUNCTIONS ->; ENVIRONMENT ->; ACCOUNT GROUP ASSIGNMENT
Transaction Code: VOPA
Menu Path: TOOLS ->; BUSINESS ENGINEER ->; CUSTOMIZING ->; SALES AND DISTRIBUTION ->; BASIC FUNCTIONS ->; PARTNER DETERMINATION ->; DEFINE PARTNER FUNCTIONS ->; GOTO ->; PARTNER FUNCTIONS ->; ENVIRONMENT ->; ACCOUNT GROUP ASSIGNMENT
Transaction Code: VOPA
6) Assign the Partner Functions to the Partner Procedure for the Sales Document Header
Menu Path: Tools ->; Business Engineer ->; Customizing ->; Sales and Distribution ->; Basic Functions ->; Partner Determination ->; Define Partner Functions
Transaction Code: VOPA
Menu Path: Tools ->; Business Engineer ->; Customizing ->; Sales and Distribution ->; Basic Functions ->; Partner Determination ->; Define Partner Functions
Transaction Code: VOPA
7) Assign the Partner Functions to the Partner Procedure for the Sales Document Item (OPTIONAL)
Menu Path: TOOLS ->; BUSINESS ENGINEER ->; CUSTOMIZING ->; SALES AND DISTRIBUTION ->; BASIC FUNCTIONS ->; PARTNER DETERMINATION ->; DEFINE PARTNER FUNCTIONS
Transaction Code: VOPA
Menu Path: TOOLS ->; BUSINESS ENGINEER ->; CUSTOMIZING ->; SALES AND DISTRIBUTION ->; BASIC FUNCTIONS ->; PARTNER DETERMINATION ->; DEFINE PARTNER FUNCTIONS
Transaction Code: VOPA
8) Edit the Pricing Communication Structure (KOMKAZ) to Hold the New Functions (Client Independent)
Menu Path: Menu Path: TOOLS ->; ABAP WORKBENCH ->; DEVELOPMENT ->; DICTIONARY
Transaction Code: SE11
Menu Path: Menu Path: TOOLS ->; ABAP WORKBENCH ->; DEVELOPMENT ->; DICTIONARY
Transaction Code: SE11
9) Edit MV45AFZZ – userexit_pricing_prepare_tkomk (Client Independent)
Menu Path: TOOLS ->; ABAP WORKBENCH ->; DEVELOPMENT ->; ABAP EDITOR
Transaction Code: SE38
Menu Path: TOOLS ->; ABAP WORKBENCH ->; DEVELOPMENT ->; ABAP EDITOR
Transaction Code: SE38
10) Edit RV60AFZZ - userexit_pricing_prepare_tkomk (Client Independent)
Menu Path: TOOLS ->; ABAP WORKBENCH ->; DEVELOPMENT ->; ABAP EDITOR
Transaction Code: SE38
Menu Path: TOOLS ->; ABAP WORKBENCH ->; DEVELOPMENT ->; ABAP EDITOR
Transaction Code: SE38
11) Edit MV45AFZB - userexit_new_pricing_vbkd changing new_pricing (Client Independent)
Menu Path: TOOLS ->; ABAP WORKBENCH ->; DEVELOPMENT ->; ABAP EDITOR
Transaction Code: SE38
Menu Path: TOOLS ->; ABAP WORKBENCH ->; DEVELOPMENT ->; ABAP EDITOR
Transaction Code: SE38
The following code should be inserted into program MV45AFZZ to allow the system to re-execute pricing if the user makes a change to the relevant partner function (alteration, addition, deletion).
13) Add the KOMKAZ Fields to the Pricing Field Catalog (Client Independent)
Menu Path: TOOLS ->; BUSINESS ENGINEER ->; CUSTOMIZING ->; SALES AND DISTRIBUTION ->; BASIC FUNCTIONS ->; PRICING ->; PRICING CONTROL ->; DEFINE ACCESS SEQUENCES ->; MAINTAIN ACCESS SEQUENCES
Transaction Code: OV24
Menu Path: TOOLS ->; BUSINESS ENGINEER ->; CUSTOMIZING ->; SALES AND DISTRIBUTION ->; BASIC FUNCTIONS ->; PRICING ->; PRICING CONTROL ->; DEFINE ACCESS SEQUENCES ->; MAINTAIN ACCESS SEQUENCES
Transaction Code: OV24
14) Create Condition Tables (Client Independent)
Menu Path: TOOLS ->; BUSINESS ENGINEER ->; CUSTOMIZING ->; SALES AND DISTRIBUTION ->; BASIC FUNCTIONS ->; PRICING ->; PRICING CONTROL ->; DEFINE ACCESS SEQUENCES ->; MAINTAIN ACCESS SEQUENCES
Transaction Code: V/03
Menu Path: TOOLS ->; BUSINESS ENGINEER ->; CUSTOMIZING ->; SALES AND DISTRIBUTION ->; BASIC FUNCTIONS ->; PRICING ->; PRICING CONTROL ->; DEFINE ACCESS SEQUENCES ->; MAINTAIN ACCESS SEQUENCES
Transaction Code: V/03
15) Create an access sequence containing the new tables (Client Independent)
Menu Path: TOOLS ->; BUSINESS ENGINEER ->; CUSTOMIZING ->; SALES AND DISTRIBUTION ->; BASIC FUNCTIONS ->; PRICING ->; PRICING CONTROL ->; DEFINE ACCESS SEQUENCES ->; MAINTAIN ACCESS SEQUENCES
Transaction Code: V/07
Menu Path: TOOLS ->; BUSINESS ENGINEER ->; CUSTOMIZING ->; SALES AND DISTRIBUTION ->; BASIC FUNCTIONS ->; PRICING ->; PRICING CONTROL ->; DEFINE ACCESS SEQUENCES ->; MAINTAIN ACCESS SEQUENCES
Transaction Code: V/07
16) Create a new condition type
Menu Path: TOOLS ->; BUSINESS ENGINEER ->; CUSTOMIZING ->; SALES AND DISTRIBUTION ->; BASIC FUNCTIONS ->; PRICING ->; PRICING CONTROL ->; DEFINE CONDITION TYPES ->; MAINTAIN CONDITION TYPES
Transaction Code: V/06
Menu Path: TOOLS ->; BUSINESS ENGINEER ->; CUSTOMIZING ->; SALES AND DISTRIBUTION ->; BASIC FUNCTIONS ->; PRICING ->; PRICING CONTROL ->; DEFINE CONDITION TYPES ->; MAINTAIN CONDITION TYPES
Transaction Code: V/06
17) Add the Condition Type to the Pricing Procedure
Menu Path: TOOLS ->; BUSINESS ENGINEER ->; CUSTOMIZING ->; SALES AND DISTRIBUTION ->; BASIC FUNCTIONS ->; PRICING ->; PRICING CONTROL ->; DEFINE AND ASSIGN PRICING PROCEDURES ->; MAINTAIN PRICING PROCEDURES
Transaction Code: V/08
Menu Path: TOOLS ->; BUSINESS ENGINEER ->; CUSTOMIZING ->; SALES AND DISTRIBUTION ->; BASIC FUNCTIONS ->; PRICING ->; PRICING CONTROL ->; DEFINE AND ASSIGN PRICING PROCEDURES ->; MAINTAIN PRICING PROCEDURES
Transaction Code: V/08
11) Create Commsission Report ZZCOMMISSION (Client Independent)
Menu Path: TOOLS ->; ABAP WORKBENCH ->; DEVELOPMENT ->; ABAP EDITOR
Menu Path: TOOLS ->; ABAP WORKBENCH ->; DEVELOPMENT ->; ABAP EDITOR
Transaction Code: SE38
SD Questions About Pricing Condition
The Most Important Tips in Pricing For SAP SD Module to crack interviews...
Whenever we define our pricing procedures, we remain least interested in creating our own Condition Types,Condition
Tables & Access Sequences. What we do is, we just define our own pricing procedures by using the existing condition types (i.e: PR00, K004, K007, KA02, KF00 etc.) & then assign that Pricing Procedure with " Sales Area, Document Pricing Procedure & Customer Pricing Procedure " .
Tables & Access Sequences. What we do is, we just define our own pricing procedures by using the existing condition types (i.e: PR00, K004, K007, KA02, KF00 etc.) & then assign that Pricing Procedure with " Sales Area, Document Pricing Procedure & Customer Pricing Procedure " .
After that we put the values against each Condition Types, mentioned in our Pricing Procedure by using the T-Code "VK11". But we also need to know about the Condition Tables, Condition Types & Access Sequence Creation. So for that purpose we have to use the following T-Codes respectively : "V/05", "V/06" & "V/07". Now it will become easy to create the same.
What is the difference of VK11 and VK31 (condition records)?
My condition type is PR00 and Access sequence is PR02. And in this access sequence table 304 is available. Now when I was entering the PR00 in VK31 it shows error Table 304 is not defining for the condition type PR02. But when I was entering the PR00 at VK11 it is accepting it.
Difference between VK11 and VK31 - if you go through the menu path you will get the vk 31 as condition record from the tamplets whereas vk11 as simple condition record. In VK11 you can store condition record for more than one condition
type. This means you can have same condition record for different condition types.This feature is given to enhance the system's performane and not to create the duplcation of the work for each condition type.
Again system is not allowing to store the record in the vk31 for the condition type pr00 and access sequence pr02.This is because if you see this ac seq cointains two accessses 20 and 30 having the same table no.But you see there is the difference between the technical view of it for transfering the data from document field and condition field,so you can not maintain the data at VK31.
What is the difference between Header condition and Item condition? I know item condition applies to each item in a sales document. Header condition can only be applied to an entire document.
Difference between header and item condition - as YOU CORRECTLY SAID HEADER CONDITION IS APPLICABLE FOR THE WHOLE DOCUMENT where as item is for item.Ex-Say fright is dependent on the total weight of all the items in the documents then header condition adds on weights of all items and calculates the record accordingly.
You have two different types of the header conditions.
a) In one you can duplicate the same value throughout the document for each item.Say discount 2% at header level which is also applicable to all the items
b)Second is the accumulation of the values of all the item at the header level,as earlier explained for the weight/fright.
These differenes are controlled through the indicator of group condition in the cond.type configuration.
And so obviously header condition can not have the condition record and hence access sequence.
1. Requirement: Denoted by nos and maintained in VOFM, this is a condition required for a particular condition type to be executed. Eg. PR00: req 2 ie item relevant for pricing
VPRS/EKO1: req 4 ie cost
Rebate BAO1 Req 24/Req 25 etc
VPRS/EKO1: req 4 ie cost
Rebate BAO1 Req 24/Req 25 etc
2. Subtotal: this represents where a which table a value is stored, which can be processed for further calculation.
Eg. for PR00, if this value is to be used for credt check of a customer, we mark the subtotal as A.
3 Alternate Calculation type: this is also denoted by numbers and maintained in VOFM. Eg. Suppose for 45 units , each unit is charged $100 per unit, the order value comes out to be $4500, that is calculation is done as per unit price, if the client wants calculation type to be based on volume or wieght, alternate calculation type can be configured.
4. Alternate base value: Denoted by no. and maintained in VOFM.
Eg, if the pricing scale is maintained and pricing for 45 units comes under the scale of $100 per unit., the base value is 45 units, but if the client wants a standard base value in some casesto be assumed inspite of maintaining the scale, an alternate base value is confihured, that is the base value based on which the order value is to be calculated changes.
5. Accruals: Accruals are maintained for rebate agreements, it constitutes the total accumulated value which customer has earned through rebate, one the rebate for certain amount is settled the amount from the accruals get deducted.
Add a field to a new condition table in Pricing (Condition Technique):-
I will explain you the process with below example...Please follow steps in below sequence-
Try to add the filed from the field catalog. In case the required combination field is not there, you can add the field through the following process to filed catalog and create the condition table. It is most common that one or other time we need to use this function while configuring multi tasking & complex Pricing Architecture.
Here I'm giving a simple guide to add fields to the Pricing Field Catalogues:
For example you want to use field PSTYV ('Sales document item category') that is included in structure KOMP ('Pricing Communication Item') as a key for a condition table.
When you create a condition table (Transaction V/03), however, the system does not propose the field in the field catalog.
Condition access, field catalog, allowed fields, KOMG, KOMK, KOMP, KOMPAZ, KOMKAZ, PSTYV are the other terms which we need to know about, to add Fields.
Reason and Prerequisites:
For technical reasons, field PSTYV was included in structure KOMP, however, not in structure KOMG ('Allowed Fields for Condition Structures').
For technical reasons, field PSTYV was included in structure KOMP, however, not in structure KOMG ('Allowed Fields for Condition Structures').
Proceed as follows:
1. Call up the ABAP Dictionary (Transaction SE11) and create data type ZZPSTYV. Choose PSTYV as a domain.As a short text, you can use, for example, 'ZZ - sales document item category' and as a field label, you can use the field labels of PSTYV.Save, check and activate your entries.
1. Call up the ABAP Dictionary (Transaction SE11) and create data type ZZPSTYV. Choose PSTYV as a domain.As a short text, you can use, for example, 'ZZ - sales document item category' and as a field label, you can use the field labels of PSTYV.Save, check and activate your entries.
2. Call up structure KOMPAZ in the ABAP Dictionary (Transaction SE11) in the change mode and make the following entry:
Component Component type:
ZZPSTYV ZZPSTYV
Save, check and activate the change you made.
Component Component type:
ZZPSTYV ZZPSTYV
Save, check and activate the change you made.
3. Note:Because of the change in structure KOMPAZ, field ZZPSTYV is now known in structures KOMG and KOMP because structure KOMPAZ is included in both structures.
4. Call up Transaction SPRO. Navigate to 'Sales and Distribution -> Basic Functions -> Pricing -> Pricing Control' and execute 'Define Condition Tables'.
Choose 'Conditions: Allowed fields' and include ZZPSTYV as a new entry.
Choose 'Conditions: Allowed fields' and include ZZPSTYV as a new entry.
5. Note:Now you can use field ZZPSTYV as a key field when you create a condition table Axxx.
6. Supply the new field you defined by including the following source code line in USEREXIT_PRICING_PREPARE_TKOMP:
MOVE xxxx-PSTYV TO TKOMP-ZZPSTYV.
In order processing you find the user exit in Include MV45AFZZ, and in billing document processing you find it in Include RV60AFZZ.
MOVE xxxx-PSTYV TO TKOMP-ZZPSTYV.
In order processing you find the user exit in Include MV45AFZZ, and in billing document processing you find it in Include RV60AFZZ.
Consider that you can also use this note as a help if you want to use other customer-specific fields as key fields in a condition table.
For header fields, use structure KOMKAZ instead of structure KOMPAZ and
USEREXIT_PRICING_PREPARE_TKOMK instead of
USEREXIT_PRICING_PREPARE_TKOMK instead of
USEREXIT_PRICING_PREPARE_TKOMP.
What are header conditions?
Header conditions are those which appear in the header level of any sales order. these conditions are to be entered manually and get distributed automatically and the basis for distribution are taken from the NET VALUE of items mentioned at item level.
When we go to the conditions section in a sales order, where the details of pricing is mentioned, here we add these conditions.
Whenever any Header Condition is used, it overrides the PR00 condition type.
Examples of header condition.
- HA00 - % Based Header Condition.
- RB00 - Absolute or numeric value which applies to all items.
- HB00 - Numeric value or Absolute value.
What is the difference between group condition and header condition?
Group Condition: You can use this is feature of a condition type to apply price or discount for a material based on common property.
Header Condition: This is a manual condition which you apply to header (Condition screen) of a sales document. This amount is applicable to all items.
Header Condition: This is a manual condition which you apply to header (Condition screen) of a sales document. This amount is applicable to all items.
Usage of this feature is to apply price / discount for a specific group of materials.
1. You maintained a discount based condition record fbased on material group ( = 01 for example). You maintained scales also.
Qty Discount
1 - 10 Rs. 100.00
11 - 50 Rs. 105.00
51 - 150 Rs. 110.00 etc.
Qty Discount
1 - 10 Rs. 100.00
11 - 50 Rs. 105.00
51 - 150 Rs. 110.00 etc.
2. You are creating a sales order for a customer with five different items with different quantities as below
ITEM 1 - 25 No's
ITEM 2 - 3 No's
ITEM 3 - 12 No's
ITEM 4 - 27 No's
ITEM 5 - 62 No's
ITEM 2 - 3 No's
ITEM 3 - 12 No's
ITEM 4 - 27 No's
ITEM 5 - 62 No's
All the material is having the material group = 01.
3. While calculating the discount, because of this group condition, system add the quantities of items which have material group = 01. In the above example total quantity is = 109. System apply a discount of Rs. 110.00 to each item irrespective of the individual quantities.
4. If you have not activated the group condition feature, system determines the discount value based on individual item quantity which is as below.
Discount
ITEM 1 - 25 No's Rs. 105.00
ITEM 2 - 3 No's Rs. 100.00
ITEM 3 - 12 No's Rs. 105.00
ITEM 4 - 27 No's Rs. 105.00
ITEM 5 - 62 No's Rs. 115.00
Discount
ITEM 1 - 25 No's Rs. 105.00
ITEM 2 - 3 No's Rs. 100.00
ITEM 3 - 12 No's Rs. 105.00
ITEM 4 - 27 No's Rs. 105.00
ITEM 5 - 62 No's Rs. 115.00
5. Is it clear now. Just try a sales order and see the out come
Procedure to Test:
1. Create 3 materials. Maintain Material Group of each item is same.
2. Activate the condition type as a group condition.
3. Create a condition record for this condition type with scales.
4. Process a sales order for a customer with these three material with different quantities.
1. Create 3 materials. Maintain Material Group of each item is same.
2. Activate the condition type as a group condition.
3. Create a condition record for this condition type with scales.
4. Process a sales order for a customer with these three material with different quantities.
5. Check the outcome.
Billing cannot be Release to Accounting This SAP message will appear if the system is unable to find the G/L codes match from the configuration in transaction VKOA
No account is specified in item 0000001001
Message no. F5 670
Message no. F5 670
Diagnosis
No account was specified for account type "S" in item "0000001001" of the FI/CO document.
No account was specified for account type "S" in item "0000001001" of the FI/CO document.
System Response
The Financial Accounting program cannot process the document.
The Financial Accounting program cannot process the document.
Procedure
A system error has probably occurred in the application you called up. Check the data transferred to item "0000001001" of the FI/CO document.
A system error has probably occurred in the application you called up. Check the data transferred to item "0000001001" of the FI/CO document.
Assuming that one of the key combination is Account Assignment Group, you will have to check whether have the Account Assignment Group been input in the Customer Master (Billing tabstrips - Accounting sections - Field name: Acct assgmt group).
The Account Assignment Group will be copied automatically into the sales order.
Check whether the configuration in transaction VKOA have been done correctly.
Check whether the sales order (VA03 - Goto - Header - Financial Accounting - Field name: AcctAssgGr) have been filled in automatically.
Check whether the billing document (VF03 - Goto - Header - Header - Field name: AcctAssgGr) have been filled in automatically.
If the customer master have not been maintained and the user have already input the sales order, then the user will have to maintained the Account Assignment Group manually either in the sales order or the billing documents.
Take note for One Time Customer, the user have to input the Account Assignment Group manually into the sales order. One Time Customer can be used by many customer, therefore, the system will not be able to determine the Account Assignment Group manually.
Default Start Variant for VF04
There are two types of variant in VF04.
One is the selection variant before clicking the Display Billing List Button.
You can set the start variant via SE93 using the Change mode.
The second variant is the Billing Layout display variant.
This is after clicking the Display Billing List Button.
After creating your layout display variant, you can set it by clicking :-
Settings ->
Display Variant
-> Administration
Display Variant
-> Administration
Select the layout display variant you want and click :-
Edit ->
Define default settings
Condition Exclusion which will be determined in the billing document
The system can exclude conditions so that they are not taken into account during pricing.For example:
Material 4711 costs 150 USD. Some customers receive a discount of 10 USD per 100 pieces.
However, a specific customer can buy the material for 100 USD. Since this is a particularly good price, the customer should not also have a discount of 10 USD per 100 pieces. Therefore, this discount is to be excluded from pricing.
To create a condition exclusion procedure which will be determined in the billing document.
Assign the procedure to the pricing schema, and maintain copy control so that pricing is not copied from Sales Order.
To achieve this, copy the standard pricing to a ZXXXX Pricing.
Define new document pricing procedure in SM30 - V_TVKV for billing.
Assign new document pricing procedures to billing types in SM30 - V_TVFK_PR
Define the Condition Exclusion Groups in OV31.
Assign the Condition type for the Condition Exclusion Groups in OV32.
Assign the Billing Pricing Procedure in VOK8 for the Condition Exclusion Groups.
When billing document is being created just enter manually your new price and the pricing program logic will include only the higher price one, excluding the rest that are lower price.
Steps for creating a new or changing an existing Billing Document Types
Create/Change your Billing types configuration in VOFA.
Some of the IMG stuff are :-
1) To block automatic transfer of the billing document to accounting, mark the field.
Indicates whether the system blocks automatic transfer of the billing document to
accounting.
Indicates whether the system blocks automatic transfer of the billing document to
accounting.
During document processing, you can manually transfer blocked billing documents to
accounting by selecting:
accounting by selecting:
Billing -> Change -> Release accounting
2) Account determination procedure
3) Output determination procedure etc. ...
After customizing, use transaction VCHECKVOFA to check your configuration :-
1) Proforma billing types: If it is a proforma billing type, (VBTYP = U), the field must
be blank and the account determination procedure must be empty.
be blank and the account determination procedure must be empty.
2) Cancellation billing document types: : A check is made to see if the cancellation
billing document type has the right VBTYP. An F2 invoice, for example, (VBTYP 'M')
can only be canceled with billing type S1 with VBTYP 'N' . A billing type with
VBTYP '5' can only be canceled with the VBTYP '6' and vice versa.
billing document type has the right VBTYP. An F2 invoice, for example, (VBTYP 'M')
can only be canceled with billing type S1 with VBTYP 'N' . A billing type with
VBTYP '5' can only be canceled with the VBTYP '6' and vice versa.
3) Cancellation billing document type partner functions A check is made to see if the
cancellation billing document type partner functions are empty or if those that
correspond to the billing type used are empty.
cancellation billing document type partner functions are empty or if those that
correspond to the billing type used are empty.
Next, make sure that you maintain the copy control for the Billing Types:
Sales documents in VTFA
Target Source
e.g. F1 - Invoice OR - Standard Sales Order
F1 - Invoice ZOR - Your Sales Order
e.g. F1 - Invoice OR - Standard Sales Order
F1 - Invoice ZOR - Your Sales Order
Billing documents in VTFF
e.g. G2 - Debit Memo F1 - Invoice
G2 - Debit Memo F2 - Invoice
e.g. G2 - Debit Memo F1 - Invoice
G2 - Debit Memo F2 - Invoice
Deliveries in VTFL
e.g. F1 - Invoice LF - Delivery
e.g. F1 - Invoice LF - Delivery
F1 - Invoice ZOR - Your Delivery
Billing Block will not worked if you did not assign it
Define the possible block indicators in SM30 - V_TVFS and
allocate them to the billing types concerned in SM30
V_TVFSP.
V_TVFSP.
Your Billing Block will not worked if you did not assigned it to the desired billing types.
You can auto block by :- 1. sales document type in transaction VOV8, fields Billing Block, or 2. item categories in SM30 - V_TVAP, by filling the fields Billing Block.
Billing Plan for Milestone Billing
Milestone billing means distributing the total amount to be billed over multiple billing dates in the billing plan. As each milestone is successfully reached, the customer is billed either a percentage of the entire project cost or simply a pre-defined amount.During sales order processing, the system determines from the item category whether a billing plan is required and, if so, which type of plan The type of billing plan that is determined at this point is set up in Customizing and cannot be changed in the sales document. Billing plans for periodic billing and milestone billing plans for project-related milestone billing have different overview screens so that you can enter data relevant to your processing. For example, for milestone billing, you must be able to enter data to identify the individual milestones.
IMG configuration requires :-
1. Maintain billing plan types for milestone billing in OVBO.
2. Define date description in SM30 - V_TVTB
. 3. Maintain Date Category for Billing Plan Type IN OVBJ
. 4. Allocate date category in SM30 - V_TFPLA_TY.
5. Maintain date proposal for Billing Plan Type in OVBM.
6. Assign Billing Plan Type to Sales Documents Type in OVBP.
7. Assign Billing Plan Type to Item Categories in OVBR.
8. Define rules for determining the date in OVBS. Milestone billing is typically used for billing projects,
such as plant engineering and construction projects. Such projects often include a series of milestones that mark the completion of different stages of the work. In the SAP R/3 System, milestones are defined in a network along with planned and actual dates for the completion of work. The milestones are also assigned to the billing dates in the billing plan. Each milestone-related billing date is blocked for processing until the Project System confirms that the milestone is completed. Delivery-relevant order items for which a milestone billing plan applies are billed on the basis of the requested delivery quantity and not on the total of the confirmed quantities. The connection between the project and the sales document item is made in the individual schedule lines of the item. Each schedule item can be assigned to a network in a project. To display the project-related data for a schedule line, proceed as follows: In one of the overview screens of the sales document, select 1. Item -> Schedule lines. 2. Mark the schedule line and select Procurement details. The following figure shows an example of milestone billing where only the Contract have been billed : Order Item Turbine 100,000 Billing Plan Billing date Description % Value Billing Block Milestone Billing Status 01-10-94 Contract 10 10,000 - x x 01-03-95 Assembly 30 30,000 x x 01-04-95 Maintenance 30 30,000 x x 01-05-95 Acceptance 30 30,000 x x 01-06-95 Final invoice .. .. x Network/Activities Milestone Estimate Actual Assembly 01-03-95 01-03-95 Maintenance 01-04-95 Acceptance 01-05-95 For each billing date in a milestone billing plan, you can specify whether the billing date is: 1. fixed 2. always updated with the actual date of the milestone 3. updated with the actual date of the milestone, if the date is earlier than the planned billing date for the date
SAP Billing - Combine Billing for deliveries with different date
When using transaction VF04 or Billing (background), the date of the billing document (e.g. the current date) must be entered (In VF04 : settings, default data.)
In VF06 or background: variant with parametrization) to avoid an unwanted split due to the billing date.
This OSS notes is very helpful :-
11162 - Invoice split criteria in billing document
36832 - Invoice split in fields from the sales order
Billing Spilt by Item Category In trx VTFA (if your billing is sales order based) choose your billing type and SO type, there select your item categories and there select the field VBRK/VBRP data. In that field you will see the currently used routine. With the help of your ABAP guy create a copy of that routine under a different number and add your lines of code. Let's say you use routine 001.
FORM DATEN_KOPIEREN_001.
FORM DATEN_KOPIEREN_001.
* Header data
* VBRK-xxxxx = ............
* Item data
* VBRP-xxxxx = ............
* Additional split criteria
* VBRK-xxxxx = ............
* Item data
* VBRP-xxxxx = ............
* Additional split criteria
DATA: BEGIN OF ZUK,
MODUL(3) VALUE '001',
VTWEG LIKE VBAK-VTWEG,
SPART LIKE VBAK-SPART,
END OF ZUK.
MODUL(3) VALUE '001',
VTWEG LIKE VBAK-VTWEG,
SPART LIKE VBAK-SPART,
END OF ZUK.
ZUK-SPART = VBAK-SPART.
ZUK-VTWEG = VBAK-VTWEG.
VBRK-ZUKRI = ZUK.
ZUK-VTWEG = VBAK-VTWEG.
VBRK-ZUKRI = ZUK.
ENDFORM.
This is how it should look after modification:
* Header data
* VBRK-xxxxx = ............
* Item data
* VBRP-xxxxx = ............
* Additional split criteria
DATA: BEGIN OF ZUK,
MODUL(3) VALUE '001',
VTWEG LIKE VBAK-VTWEG,
SPART LIKE VBAK-SPART,
PSTYV LIKE VBAP-PSTYV, <- New line
END OF ZUK.
MODUL(3) VALUE '001',
VTWEG LIKE VBAK-VTWEG,
SPART LIKE VBAK-SPART,
PSTYV LIKE VBAP-PSTYV, <- New line
END OF ZUK.
ZUK-SPART = VBAK-SPART.
ZUK-VTWEG = VBAK-VTWEG.
ZUK-PSTYV = VBAP-PSTYV. <- New line
VBRK-ZUKRI = ZUK.
ZUK-VTWEG = VBAK-VTWEG.
ZUK-PSTYV = VBAP-PSTYV. <- New line
VBRK-ZUKRI = ZUK.
ENDFORM.
After this routine is created and activated place it as the default copy control routine instead of the old ones.
Maximum number of items in FI reached Message no. F5 727
If you hit the above erros when you create an invoice in SD, the corresponding accounting document is not created.
The error is as follows:
Maximum number of items in FI reached Message no. F5 727
Diagnosis
The maximum number of items for an FI document ('999') has been exceeded.System response
FI documents have a 3-digit item counter that limits the number of items permitted per document.
Procedure
If the documents with an excessive number of items come from another application area
(e.g. sales, logistics, order accounting), you can configure the system to the effect that
these documents are summarized in FI. "
How could this error be solved as none of your invoices are getting accounted in FI?
To overcome this, the only way was to break the accounting invoices, 1 with 950 items and the other with the rest.
Restricting Number Of Items In Billing Doc
You can restrict delivery with delivery tolerance, thereby causing invoicing of the desired.
o
Go toSPRO>>>IMG>>>Sales& Distribution>>>Billing>>>Billing Documents>>>Country-specific features>>>Maintain Maximum No. Of Billing Items.
This is where you can define a maximum number of items allowed for all billing documents within a given sales organization.
However, maintaining data here is not enough alone to bring about a billing split by number of billing items.
You must also go to copying control for order/delivery to billing document at item level under "Data VBRK/VBRP" and maintain routine 006 "individual invoice limited" or a similar routine that accesses the data maintained here.
Assign a Cost Center manually in a Sales Order (VBAK-KOSTL)
Taxation Explain with an example
When you enter the material number of a bill of materials that is relevant for sales order processing, the system displays the material that describes the whole bill of materials as a main item. The individual components are displayed as lower-level items.
If you want the system to carry out pricing, inventory control, and delivery processing at main item level, enter ERLA in the Item category group field of the Sales: sales org. 2 screen in the material master record of the finished product. This means that the components only function as text items and are not relevant for delivery. The following graphic shows how a bill of material is processed at main item level.
How to do rebate processing
SAP SD Tutorials and Pdf guides to download.Basic Process of how Packing Works
Default First Date is not Today
When end user created a new sales order with VA01, default First Date wasn't today, why?
Note:
1. Before today, default First Date was always today.
2. Nobody change system configuration.
1. Before today, default First Date was always today.
2. Nobody change system configuration.
Although you mention that nobody change the system configuration, it is very unlikely that the system will mis-behaved after one day.
Usually, after checking, you will find that someone have actually change the configuration as it could not be a software bug since you have been using it for quite sometime without any problems.
The date is control by each Sales Order Type for each Sales Document type whether is it a
- OR - Standard Order,
- RE - Returns etc.
- OR - Standard Order,
- RE - Returns etc.
Verify the Sales order type configuration with the following path:
IMG: Sales and Distribution --> Sales --> Sales Docs --> Sales Doc Hdr --> Define Sales Doc Types (transaction vov8) will let you control this by sales document type.
There is one field (Lead time in days) which "specify the number of days after the current date that the proposal for the requested delivery date in the sales document should be".
This should be blank if you want the system to propose current day for delivery date.
Auto proposed all the dates when creating Sales Order
How can I make the system auto create all the Sales Order date during creation?
Each Sales Order can have different date proposal settings.
Follows this step to set the default Sales Order Type proposal date:
- Goto VOV8, double click on sales order type.
- Look and tick the fields Propose delivery date and Propose PO date.
After making the necessary IMG changes, you need to input the Delivery Plant field for each Materials that you want the system to propose the default date.
To change the Materials field Delivery Plant:
Goto MM02, Select the View Sales: Sales Org. Data 1 and fill in the Delivery Plant.
Testing:
Now, try creating a new sales order for the material and SAP will auto proposed all the dates in the sales order
Define whether the Material can be used at which Sales and Distribution process
Here you define how the system responds when entering a sales and distribution document
with this material in the differenet Sales and Distribution Process Flow..
with this material in the differenet Sales and Distribution Process Flow..
You can use the material status, for example, to prevent orders from being entered for
parts to be discontinued.
parts to be discontinued.
OR
To temporary block the creation of Sales Order for a certain materials.
Set the material status parameters in transaction SM30, Table Views V_TVMS
The Cost Center Determination settings is in OVF3 - but there are some cases where the Cost Center must be exceptionally changed.
If the document category for order type in IMG VOV8 is defined to be "I" which belong to order type FD - Deliv.Free of Charge, then the field cost center is active for input during transaction VA01.
Alternatively, you can specify an order reason and assign a cost center to an order reason.
However the standard SAP works only at the header level though, so it would not work if cost center is needed on the line item.
The cost center are assign for such business transactions as :
- Free deliveries
- Returns
- Deliveries of advertising materials
- Returns
- Deliveries of advertising materials
You can also make cost center allocation dependent on the order reason, for example:
Order reason: Damage in transit
Order reason: Free sample
Order reason: Free sample
Both the IMG settings are done in transaction OVF3, either with/without the order reason.
Sales and Distribution - Transfer of Requirements
The MRP department is informed about the quantities and deadlines by which incoming orders should be delivered. The system checks the availability of the goods based on the requested delivery date of the customer and creates MRP records which contain all necessary information for passing on to planning. It ensures that the goods are available in time for the delivery. Materials planning transfers the reported requirements and creates orders or purchase requisitions from them etc.
For controlling transfer of requirements, you have to carry out the following steps: 1. Each requirement type has to be allocated to one requirement class only. 2. The transfer of requirements must be switched on at requirements class level, the sales documents at schedule line level. 3. You must define a check group. It is possible to have this check group proposed for the initial creation of a material master record. 4. Note that a plant must exist for transfer of requirements to be carried out at document item level. OVZG - Requirement class It specifies the following points: - whether an availability check and a transfer of requirements is carried out for a transaction (for sales documents, fine tuning using the schedule line category is possible), - whether the requirements are relevant for MRP, - the allocation indicator from the sales view which controls the settlement of customer requirements with requirements - whether an item is to be settled to an auxiliary account assignment, - the settlement profile, - the results analysis key. (Use transaction SM30 for V_* configuration) OVZH - Requirements type V_TVEPZ_V - Assignment of requirement type to Transaction V_TVEP_V - Schedule line category OVZ2 - Define Checking Group V_TMVFU - Define the checking group that the system proposes when you create a new material master record. You can overwrite the default value for the checking group in the material master record.
For controlling transfer of requirements, you have to carry out the following steps: 1. Each requirement type has to be allocated to one requirement class only. 2. The transfer of requirements must be switched on at requirements class level, the sales documents at schedule line level. 3. You must define a check group. It is possible to have this check group proposed for the initial creation of a material master record. 4. Note that a plant must exist for transfer of requirements to be carried out at document item level. OVZG - Requirement class It specifies the following points: - whether an availability check and a transfer of requirements is carried out for a transaction (for sales documents, fine tuning using the schedule line category is possible), - whether the requirements are relevant for MRP, - the allocation indicator from the sales view which controls the settlement of customer requirements with requirements - whether an item is to be settled to an auxiliary account assignment, - the settlement profile, - the results analysis key. (Use transaction SM30 for V_* configuration) OVZH - Requirements type V_TVEPZ_V - Assignment of requirement type to Transaction V_TVEP_V - Schedule line category OVZ2 - Define Checking Group V_TMVFU - Define the checking group that the system proposes when you create a new material master record. You can overwrite the default value for the checking group in the material master record.
Define Tax Determination Rules
You specify the valid tax types in transaction OVK1. More than one tax type can be defined for a country by defining the sequence.
The SAP System determines the taxes automatically within pricing.
In the standard SAP R/3 System, the elements of tax calculation are predefined (for example, tax condition type "MWST" for taxes on sales and purchases).
Assign the plant for Tax Determination in OX10, using the country key, the SAP System recognizes which tax type is valid for a plant and thus which taxes are relevant when creating an SD document.
Define the Customer Taxes in OVK3, you will maintain the tax code in Customer Master.
Define the Material Taxes in OVK4, which will then be maintain in Material Master.
For example :-
MWST GST 0 Tax Exempt
MWST GST 1 Liable for Taxes
MWST GST 0 Tax Exempt
MWST GST 1 Liable for Taxes
Now, you define the Tax Determination in VK12.
VK12 - Domestic Taxes/Export Taxes
Condition Type MWST
Customer Taxes Material Taxes Rate Taxes
0 0 0 %
0 1 0 %
1 0 0 %
1 1 9 %
0 0 0 %
0 1 0 %
1 0 0 %
1 1 9 %
In this example, if both the Customer Master and Material Master Tax code is 1, Tax will be included when you create the Sales Order.
Tax Code in Customer Master / Sales Order
How can we maintain the Tax Code (Tax code - which we maintain in MWST Condtion Records) in Customer Master or in Sales Order?
There are few points which I would like to remind you:
1) MWST is a tax condition which is applied to customer to whom we are selling. The rate of tax is depend on various parameteres, whether is fully liable for tax or expemted (in case of Defence Customer)
2) There are few parameteres which we apply tax condition. Whether customer is tax liable? Whether material is tax exempted?
For example, if you are selling a goods which are free for tax to any customer, put the Tax Indicator (at MMR as '0'). If your
material is tax liable pur the Tax Indicator (at MMR as 1). If your customer is not liable for tax at all (like the case of Indian
Defence organisations) put the Tax Indicator (at CMR as 0) or 1 in case fully tax liable.
material is tax liable pur the Tax Indicator (at MMR as 1). If your customer is not liable for tax at all (like the case of Indian
Defence organisations) put the Tax Indicator (at CMR as 0) or 1 in case fully tax liable.
3) Now, at VK11 you need to mainatain your pricning conditions with all the combinations like:
1 0
1 1
0 1
0 0
1 1
0 1
0 0
4) While maintaining your Material Master Records or Cusotmer Master Records, you must identify, which are tax liable and which are tax exempeted.
5) In anycase, as a SAP standard Best Practises, while processing a sales order, you must retrieve a Tax condition record from SAP database only and not entered Manually. Accordingly, at V/06, the MWST condition Defintions, the field for 'Manual Entries', it would be marked as - D (Not possible to process Manually).
Due to this setting, normally, you cannot maintain Condition tax code during sales order processing. And in Cusotmer Master, you can only maintain Tax Indicator and not Tax Code.
6) In case your client insists for Manual entry of Tax code during Sales Order processing, you can change the field at point 5) above to C-Manual entry is priority instead of D.
I'm assuming that, the country is India and based on its requirement:
Sales tax is a state government revenue. There are two types of sales taxes, Local sales tax & central sales tax. Local sales tax is intra state whereas CST is inter state.
Example of LST : Point of sale i.e. delivering plant & ship to party are within the same state. The rates are defined by the respective state governments.
Example of CST : The Delivering plant & Ship to party geographic locations are 2 different states. At the point of sales from one state, the ST goes to that state govt. & consignment is despatched to the Ship to party. Once that consignment is received at the ship to party state, sales tax will be levied once the sales is registered there. For this case, the LST that is applicable by the Ship to party further will not be applicable in all probability to be captured in SAP.
Stock transfer : This does not attract any sales tax. The consignment is transferred from one D plant to another D plant irrespective of inter/intra state sales. The invoice that is accompanied with the consignment thus shall not have any final value. It's a zero value invoice, but the basic prices needed to be mentioned.
The selling organisations normally needs to register with the sales tax authority of the respective state to have a warehouse or D plant to avoid the double taxation for their dealers/distributors.
Now, the pricing procedure that is there in 4.7 is Factory sale with formula-JFACT, in which the CST condition type is JIN1 & the LST is probably JIN2. There may be surcharge cond types as well which will calculate the amount on either JIN1 or JIN2.
For config :
1.SPRO > S&D > Basic fn. > Pricing > Pricing control > Define & assign Pric. procedure > Maintain Pric proc.
2. The tax rates are normally driven from the Tax classification of Customer & Material access. To do this config, S&D >Basic fn. > Taxes. You need to include the condition type for country IN in 'Define tax determin rule'.
3. Same path : But go to Tax relevancy of master records where you configure the condition type & options of rates that will flow to these masters. One needs to understand here properly as u need to have unique combinations for picking the sales tax rates. I will try to demonstrate the smallest example. Let's say, the LST rates are 2%,4% & 0%. I will have two options for material master here. 1 for taxable & 2 for not taxable.
For customer master, I will have 1-LST 2%, 2-LST4% & 3-LST0%. When I create master records for LST thru VK11 for JIN2, I will chose the access where the combinations of customer & material tax classifications are available. If this access does not exist create it under an access sequence. But normally this is standard. The condition records will look like,
Cust-Tax classi. Material tax claasi. Rate Tax code
1 1 2% A1
2 1 4% A1
3 1 0% A1
Cust-Tax classi. Material tax claasi. Rate Tax code
1 1 2% A1
2 1 4% A1
3 1 0% A1
Remember, rates are flown from the tax codes. Tax codes can be created thru T code FTXP. This is normally a FI job.
SAP SD: Scheduling Agreement Vs Contract
A schedule agreement contains details of a delivery schedule but a contract just contains quantity and price information and no details of specific delivery dates
What's the difference between schedulling agreement with normal order?
What's the condition for us to choose schedule line or order?
What's the condition for us to choose schedule line or order?
Both of them contains schedule line, price, quantity.
There are a couple major differences:
(1) - Schedule agreements allow you to have 2 different sets of schedule lines (VBEP-ABART). Standard SAP you should have two sets of tabs - of schedule lines. One Forecast & the other JIT. Forecast forwards the schedule lines to planning (seen in MD04) and JIT passes them to shipping (VL10). They can be identical or different. Typically these are used for component supplier customers (namely Automotive). The customer will provide you 4-10 weekly buckets (usually a
Monday date) of future forecast qtys. Also send you 1-2 weeks of individual FIRM ship dates - which are entered on the JIT. It comes down to the customer not knowing exactly what they need next week, but they don't want to suprise you with a large order qty, where your lead times are 5+ days. The forecasted qtys they sent last week should account for this.
Monday date) of future forecast qtys. Also send you 1-2 weeks of individual FIRM ship dates - which are entered on the JIT. It comes down to the customer not knowing exactly what they need next week, but they don't want to suprise you with a large order qty, where your lead times are 5+ days. The forecasted qtys they sent last week should account for this.
(2) Cumulative Quantities are tracked and influence how the schedule agreement passes requirements to both forecasting and shipping. These qtys are sometimes requested by the customer on ASNs. Cumulative qtys reset at year end unless you've got a customer calendar or you've modified standard SAP userexits to not reset.
Schedule agreements are very nice when the customer sends EDI data (830s = forecast or 862s = JITs). Outside of that they can really cause trouble regarding daily maintenance, missing requirements, cum qty corrections, year end processing, etc.
One alternative would be to use customer independent requirements - entering the weekly, monthly forecasting qtys and entering standard sales orders (with or without multiple schedule lines) to represent the true firm qtys.
Sales BOM Implementation
A bill of material (BOM) describes the different components that together create a product. A BOM for a bicycle, for example, consists of all the parts that make up the bicycle: the frame, the saddle, wheels, and so on.
Process Flow
When you enter the material number of a bill of materials that is relevant for sales order processing, the system displays the material that describes the whole bill of materials as a main item. The individual components are displayed as lower-level items.
There are two ways to process a bill of materials in Sales. Once you have entered a bill of material in a sales order, the system runs pricing, inventory control, and delivery processing at:
- Main item level if the material is assembled, or
- Component level if the material is not assembled
- Component level if the material is not assembled
The type of processing used by the system is determined by the item category group that you enter in the material master record for relevant materials.
Processing at Main Item Level
If you want the system to carry out pricing, inventory control, and delivery processing at main item level, enter ERLA in the Item category group field of the Sales: sales org. 2 screen in the material master record of the finished product. This means that the components only function as text items and are not relevant for delivery. The following graphic shows how a bill of material is processed at main item level.
Processing at Component Level
If you want the system to carry out pricing, inventory control, and delivery processing at the component level, enter LUMF in the Item category group field of the Sales: sales org. 2 screen in the material master record of the finished product. In this case, only the components are relevant for delivery. During processing the system automatically creates a delivery group. The latest delivery date among all the components becomes the delivery date for the entire delivery group.
Sales Order Mass Change
There is transaction MASS which can be used to carry out mass changes in the sales order and other objects.
Mass Maintenance: (Use to change multiple fields in multiple documents at the same time). I have done mass change for customers; and orders should work the same way too.
1) Try t-code [MASS] and select sales orders & execute
2) Choose the table or tables for your selection criteria and also for fields you want to change.
Then execute. (suppose your selection criteria fields are from "sales order header data" table and the field you want to change, is in "item data" table)
Then execute. (suppose your selection criteria fields are from "sales order header data" table and the field you want to change, is in "item data" table)
3) Put in the sales documents(21000000, 21000001) you want to change and also the items(10) you want to change.
- click on " choose selection fields" button
- From the Pool, move the fields you want to the "select fields" using arrows.
- click on " choose selection fields" button
- From the Pool, move the fields you want to the "select fields" using arrows.
4)From mass maintenace menu, click on "Enter new field values"
-click on "sales order item data" tab and choose the field you want to change.
(for example. I want to change plant for item 10)
-enter the new value (of the plant to be)
-click on "Adopt" and execute
-click on "sales order item data" tab and choose the field you want to change.
(for example. I want to change plant for item 10)
-enter the new value (of the plant to be)
-click on "Adopt" and execute
5)In "sales order item data" tab, you see the new value of the plant you entered at the top and the old values of item 10 are below.
-click on "change field values" button. you see all the old values are changed to new values.
-save
Note: it will take some time depending on how many records you have.
Check: Go to [SM37] and see the status of the job you are running and once finished, export the spool file to a spreadsheet.
Before you do mass maintenance, go to the particular table in [se16] and get the results. Then do the mass maintenance and compare the results with this one. If they match, then you are good to go.
Note: If you have any user exits that affect the results, ask them to deactivate the MODCHECKS still you are done with mass maintenance & activate them again.
Is there a way to change the billing date on a ton of sales orders with same old billing date to a same new billing date?
This can be done using the mass transaction:
Transaction: MASS
Object Type: BUS2032
Tables: SD Document: Business item data
Sel Field: Billing Date (MASSSDHE and MASSSDPO)
- Or you can just select by document numbers (May be more efficient)
Execute - List will be provide for changes
Transaction: MASS
Object Type: BUS2032
Tables: SD Document: Business item data
Sel Field: Billing Date (MASSSDHE and MASSSDPO)
- Or you can just select by document numbers (May be more efficient)
Execute - List will be provide for changes
Sel Chg Fld: Billing Date
Set new billing date value in the New Values field
Click on lower billing date column
Click on Carry out a Mass Change button
Click on Save button
Set new billing date value in the New Values field
Click on lower billing date column
Click on Carry out a Mass Change button
Click on Save button
Suggestion is to test this on a few orders in your development system to get a feel on how this works before applying this to any production data. MASS is a very powerful tool.
I have 100000 sales orders whith an incorrect price and I would like to do a massive condition update with pricing type "B" (Carry out new pricing). Is there a transaction or program for this?
Go to VA05 execute the report. Select all sales orders you want to update the price, Go to the Menu EDIT --> MASS Change ---> New Pricing. System will display all the re-pricing options. Select B. It will re-price all the sales orders.
You can try for one or two order initially check the results and if it is OK, then you can do for others.
Rebates Processs in SAP is divided into three components
1) Configuring Rebates
2) Setting Up Rebates
3) Managing rebate agreeeements and payments
1) Configuring Rebates
2) Setting Up Rebates
3) Managing rebate agreeeements and payments
Pre-requsiistes- Check the following:
1.The payer partner needs toi have the rebate field checked in the customer master on the sales area-billing doc tab.
2.The Billing type must be marked as relevant for rebates.
3.The Sales Organisation must be marked as relevant for rebates.
1.The payer partner needs toi have the rebate field checked in the customer master on the sales area-billing doc tab.
2.The Billing type must be marked as relevant for rebates.
3.The Sales Organisation must be marked as relevant for rebates.
Condition Technique :
Rebates, use the condition technique, but distinguish themselves from pricing in applying to transactions over time, versus on a transaction basis. Rebates have their wn field catalog and their own condition table naming convention.So you could have two condition table "001" one for pricing and one for rebates, which could have different key fields. You need to use the technical names A001 For pricing and KOTe001 for rebates when you use the query type using transaction SE 16..
Rebates, use the condition technique, but distinguish themselves from pricing in applying to transactions over time, versus on a transaction basis. Rebates have their wn field catalog and their own condition table naming convention.So you could have two condition table "001" one for pricing and one for rebates, which could have different key fields. You need to use the technical names A001 For pricing and KOTe001 for rebates when you use the query type using transaction SE 16..
Use create access sequence (AS). Enter 1 in field category for rebate specific. AS after going thru the right path of maintaining access sequence for rebates.
The big difference between the rebate and the pricing access sequence is that there is no exclsuion flag available for rebate related AS. This means multiple tables for an access sequence can be aplied at the same time.
Rebate related condition types are identified by codnition class -C.
Rebate related condition types are identified by codnition class -C.
After defining and creating condition types for rebated include them in the pricing proceedure. The requirement should be 24 here which implies that the accruals are calculated on the basis of invoice/bill.
The other fields- alctyp and altcbv does not allow you to manipulate how a rebate is calculated. Also, remove the requiremnt 24, if u want to see reabtes at order time.
Now payment of rebates:
Payments can be maunal or in full settlement. When you do manual payments, it defines how much can be paid out during a partial settlemetn. You use partial settlement only when rebate agreement is defined for a full year but the paoyouts are supposed to happen on a monthly, quarterly or anyother specified period.
Payments can be maunal or in full settlement. When you do manual payments, it defines how much can be paid out during a partial settlemetn. You use partial settlement only when rebate agreement is defined for a full year but the paoyouts are supposed to happen on a monthly, quarterly or anyother specified period.
These accurals are based on sales volume and when they are posted billing is created int eh follwoing manner. Provision for accruals is debited and Sales revenue is credited. When rebate credit memo is created
Customer account/ is debited and
Customer account/ is debited and
Accrual provision account is credited.
Rebate Process with Ref. to SO
Rebate agreemnts is based on agreement types.Conditon records which are created like B001 and B002 are linked to the rebate agreeements specifying the rebate rate + the accrual rates.condition records specify the rebate rate and the accrual rates.
Consider an example..
You decided to give a rebate of 3% to a customer whose sales vol is $1000 for a particular SO
Then the rebate value is $30..
Now when you make the rebate settlement by doiing the Credit memo and you decide to pay $27, then the accounting will be generated saying 27$ paid towards rebate and 3$ is the accrual which you owe to the customer
Procedure:
Rebate agreement: Transaction code: VB01
When you go to VB01, choose agreement type 0002 and then in conditions give
Material rebate
1 20
20 30
Now create a sales order with a material say M-11 for SOrg 1000 12 00 with QTY 6
Now check VB03 and see rebate agreemtent it will say Accruals 120 and payments 0
since your rebate is not settled still.
Rebate setllement
Go to VB02 enter ur sales deal no, and change the agreemetn status to B then enter Shift+F12 and enter the amount to be paid for example u say $80
Then check in rebate payments rebate doc and partial setllemetn since you have not paid in full.
View the credit memo request
Remove the Billing bloock Go to VA01 and put order type G2 ,,,go to create with ref and enter ur Sales order no,,,save the doc now...
Then go to VF01 and enter the credit memo reqst no generated...save the doc no and go to VF02 and say release to accounting
Now the final settlement will be this way
Accruals:120
Accrual reversed:80
Rebate pay:80
Amount payable:40
So the balance 40 is still the accrual
Consignment Sales Process in SAP
The consignment process in SAP standard consist of four small processes:
Consignment fillup (send materials to customer consignment).
Here you have a consignment fillup order and a consignment fillup delivery.
Here you have a consignment fillup order and a consignment fillup delivery.
Consignment issue (issue materials from customer consignment to the customer).
Here you have a consignment issue order, consignment issue delivery and a consignment issue invoice. (the flow is very similar to a normal OR flow, but the materials are issued from the consignment stock instead of plant stock unrestricted).
Here you have a consignment issue order, consignment issue delivery and a consignment issue invoice. (the flow is very similar to a normal OR flow, but the materials are issued from the consignment stock instead of plant stock unrestricted).
Consignment return (return materials from customer ownership to customer consignment).
Here you have a consignment return order, consignment return delivery and a consignment return invoice. (the flow is very similar to a normal RE flow, but the materials are returned to the consignment stock instead of plant stock returns).
Here you have a consignment return order, consignment return delivery and a consignment return invoice. (the flow is very similar to a normal RE flow, but the materials are returned to the consignment stock instead of plant stock returns).
Consignment pickup (pickup consignment stock and move it to plant stock).
Here you have a consignment pickup order and a consignment pickup delivery.
Here you have a consignment pickup order and a consignment pickup delivery.
Note that in consignment fillup and consignment pickup there are no invoices since there is no change of ownership for the materials.
How to perform a consignment order?
In consignment orders you are allowing the stock to sit in your customer location. Once he informs that he used the stock you will invoice him. If he returns the stock you will accept the stock to take it back.
It is defined in 4 steps.
1. Consignment fill up:
Sales document type is KB
Item category KBN
shedule line category E1
Sales document type is KB
Item category KBN
shedule line category E1
In this step, you are not invoicing the customer. document flow is sales order ---- delivery item category. It will not be relevent for billing and pricing because you are not charging money for these goods in this step.
In schedule line category, you will set movement type 631 & set for availability check and TOR.
2. Consignment Issue.
Once the customer informed you that he used all the goods or partial goods then you will create consignment issue for used goods.
Once the customer informed you that he used all the goods or partial goods then you will create consignment issue for used goods.
Sales document: KE
Item category: KEN
shedule line category: C0 or C1
Item category: KEN
shedule line category: C0 or C1
Here you are invoicing the customer(because he used the goods). you are assigning the delivery documnt and billing document to the sales document.
In item category, you are setting relevent for billing, pricing, special stock.
In schedule line category, your setting is 633 movement type, relevent for availability check & TOR.
3. Consignment Return:
Customer found that some goods are damaged or he not able to sold the goods he want to send it back. that you are creating this document.
Customer found that some goods are damaged or he not able to sold the goods he want to send it back. that you are creating this document.
Sales document type: KR
Item category: KRN
Shedule line category: D0
Item category: KRN
Shedule line category: D0
You will assign delivery document and billing to sales document. you will create return order, return delivery, return billing.
Your setting item category relevent for billing, returns, pricing, special stock.
Your setting schedule line item category: 634 movement type, NO availability NO TOR.
Your setting item category relevent for billing, returns, pricing, special stock.
Your setting schedule line item category: 634 movement type, NO availability NO TOR.
4. Consignment Pick up:
Even if you create the consignment return the goods are not come to direct to your plant. For that you need to create consignment pick up. here the owner ship is not changing so you do not need to create billing.
Assign retrun delivery to sales document type.
Even if you create the consignment return the goods are not come to direct to your plant. For that you need to create consignment pick up. here the owner ship is not changing so you do not need to create billing.
Assign retrun delivery to sales document type.
Sales document: KA
Item category: KAN
schedule line category: F0 & F1
Item category: KAN
schedule line category: F0 & F1
Your setting item category relevent for returns. any shedule line category relevent for 632 movement type, MRP, availability check, delivery.
Number Ranges In Sales Order
This is regarding number ranges defining and assigning tips which you can follow as below:
Whenever there is a new Sales Org being created, you will be required to maintain Number Ranges for Sales Documents which are allowed for your New Sales Area.
Number Ranges can be maintained Internally by the system, however it can be maintained externally also if you customize it accordingly.
In Standard SAP the Transaction code for Maintaiing Number ranges externally is VN01.
Defining - The same can be reached through in IMG as : Sales & Distribution-->Sales-->Sales Document Header-->Define Number Ranges for Sales Documents.
Here you provide the system a specific Number range as follows:
Number range Key +Start Number range+ End Number Range+Current Number
For Example: If you want to propose the following Number Range
*1 9000076000 9000076999 0
The Current Number field will be kept zero as you are proposing new number range and no sales documents have been created on it , Obviously..
*1 is a Unique Two digit Alphanumeric Key, while proposing your key, you should ensure that it should not be there in the system as existing.
If you propose a key that is there in the system or if the Number Range (Start and End Series) is there in the system already, the system will throw a message that Interval already already exists. So choose a key that is unique, and which is not there in the system.
Here , by making this , you are assigning a Key to a Number Range Series.
All the symbols can be used along with numbers from 0 to 9 and Alphabets from A to Z and in any order. For example: !1, ^A, BB,Z*,M2.........
Assigning - In Assigning, you assign the particular Sales Document to the Number Range you have already proposed as above.
The Assigning Part is done as follows:
The Two digit Alpha Numeric Key is maintained or Assigned to the respective Sales Document type in V0V8.
This can also be reached in IMG by:
Sales & Distribution-->Sales-->Sales Document Header-->Define Sales Document Types
Locate the particular Sales Doc Type, and double click on it to display it configuration. Here you put the Two Digit Number key in the Field- "Number range External Assignment"
Besides this:
If a new Shipping Point is created then Delivery Number ranges are required to be maintained.
Similarly,
If a new Plant is created then Billing Number Ranges are required to be maintained.
What is Debit note and Credit note
What is Debit note and Credit note? What is the purpose? How we create?
1. A transaction that reduces Amounts Receivable from a customer is a credit memo. For eg. The customer could return damaged goods. A debit memo is a transaction that reduces Amounts Payable to a vendor because, you send damaged goods back to your vendor.
2. Credit memo request is a sales document used in complaints processing to request a credit memo for a customer. If the price calculated for the customer is too high, for example, because the wrong scale prices were used or a discount was forgotten, you can create a credit memo request. The credit memo request is blocked for further processing so that it can be checked. If the request is approved, you can remove the block. The system uses the credit memo request to create a credit memo.
You can use credit memos in Sales and Distribution (SD) for assigning credit memo requests to the open invoices and in Financial Accounting (FI) for assigning credit memos and payments to the open invoices and carry out clearing with them. If you use both Financial Accounting (FI) and Sales and Distribution (SD), there is a 1:1 relationship between the credit memo request and the credit memo item posted in Financial Accounting (FI). As soon as you bill the credit memo request together with other sales orders, or distribute the items of one credit memo request to several billing documents, the assignment is no longer valid and the system will not process it.
For credit memos, credit memo requests, and payments, you have the following assignment options:
- Assignment to a single invoice
- Assignment of a partial amount to an invoice
- Assignment to several invoices
When you post credit memos, the payment programme processes them automatically. If the credit memo is specifically related to a particular open invoice item, the payment program automatically attempts to offset the credit memo against the open item. If it is not possible to completely offset the credit memo against an invoice, you can post a debit memo to the vendor, who is to reimburse the amount. Then you can apply a multilevel dunning program.
3. Debit memo request is a sales document used in complaints processing to request a debit memo for a customer. If the prices calculated for the customer were too low, for example, calculated with the wrong scaled prices, you can create a debit memo request. The debit memo request can be blocked so that it can be checked. When it has been approved, you can remove the block. It is like a standard order. The system uses the debit memo request to create a debit memo.
4. As mentioned above, creating a credit or debit memo request enables you to create credit or debit memos based on a complaint. For this first create a sales document with the order type for a credit or debit memo request. You can create the debit or credit memo requests in the following ways:
– Without reference to an order
– With reference to an existing order
Here you enter which order the complaint refers to.
– With reference to an invoice
Here you enter which invoice the complaint refers to.
In all cases, you specify the value or quantity that should be in the credit or debit memo
5. You can block the credit or debit memo request from being billed in Customizing. Go to Sales -> Sales Documents -> Sales document header -> Define sales document type and select the billing block field in the billing section. This request can later be reviewed along with similar ones, - if necessary, by another department. The request for a credit or debit memo can then be approved or rejected.- Assignment to a single invoice
- Assignment of a partial amount to an invoice
- Assignment to several invoices
When you post credit memos, the payment programme processes them automatically. If the credit memo is specifically related to a particular open invoice item, the payment program automatically attempts to offset the credit memo against the open item. If it is not possible to completely offset the credit memo against an invoice, you can post a debit memo to the vendor, who is to reimburse the amount. Then you can apply a multilevel dunning program.
3. Debit memo request is a sales document used in complaints processing to request a debit memo for a customer. If the prices calculated for the customer were too low, for example, calculated with the wrong scaled prices, you can create a debit memo request. The debit memo request can be blocked so that it can be checked. When it has been approved, you can remove the block. It is like a standard order. The system uses the debit memo request to create a debit memo.
4. As mentioned above, creating a credit or debit memo request enables you to create credit or debit memos based on a complaint. For this first create a sales document with the order type for a credit or debit memo request. You can create the debit or credit memo requests in the following ways:
– Without reference to an order
– With reference to an existing order
Here you enter which order the complaint refers to.
– With reference to an invoice
Here you enter which invoice the complaint refers to.
In all cases, you specify the value or quantity that should be in the credit or debit memo
SAP SD CIN Configuration
What is CIN?
CIN Means Country India Version
CIN Means Country India Version
In Indian Taxing procedure, Excise Duty plays a vital role in manufacturing cenario’s. Excise related configuration is known as CIN configuration. CIN Configuration is a topic in itself.
Some info on CIN Configuration (it may not appear as understandable below, but if you check on screen, it will be understood better)
Country Version India comes with four pricing procedures as follows:
- JINFAC (Sales from manufacturing plants)
- JINEXP (Export sales)
- JINDEP (Sales from depots)
- JINSTK (Stock transfers
- JINFAC (Sales from manufacturing plants)
- JINEXP (Export sales)
- JINDEP (Sales from depots)
- JINSTK (Stock transfers
CIN: IMG > Logistics - General > Tax on Goods Movement > India > Basic Settings > Maintain Excise Registrations
In this IMG activity, you maintain the data relating to your excise registrations.
- Enter each of your excise registrations, specifying a four-character code for each Excise Registration Ids
- Enter each of your excise registrations, specifying a four-character code for each Excise Registration Ids
In this activity, you maintain excise registration IDs. You create one ID for each of your business's excise registrations.
- For each excise registration in your business create a registration ID, and state:
- Which taxes the registration covers (additional excise duty, special excise duty, and cess) Fields for any taxes that are not covered will be hidden in transactions involving excise duty.
- The maximum number of items to be printed on each excise invoice
- Whether you are allowed partial CENVAT credits
Maintain Registration ID NUMBER, Excise code number, excise registration number
ECC Number: Specifies the organization's ECC number.
Excise Registration Number: A number assigned to each premises or location that has registered as a manufacturer with the excise authorities.
Every entity with an excise registration number is required to keep its own excise books.
Excise range: Specifies the excise range in whose area the excise registration is located.
Excise Division: Specifies the excise division in whose area the excise registration is located.
Excise Collectorate: The code of the excise collectorate in whose area the excise registration is located.
Indicator for confirming, AED usage Additional Excise duty Percentage.
These are livable under the additional duties of excise act. These duties are in addition to basic excise duty and special excise duty. Example - Additional Excise duty is livable in case of textile products, tobacco and sugar.
These are livable under the additional duties of excise act. These duties are in addition to basic excise duty and special excise duty. Example - Additional Excise duty is livable in case of textile products, tobacco and sugar.
Similarly for SED CESS Number of Items in Excise Invoice Shows the maximum number of line items that the authorities allow per excise invoice.
Dependencies - This information is used when you create an excise invoice in Sales and Distribution (SD) for factory sales and for other movements. This information is used to split the transfer postings' items into multiple subcontracting challans.
Excise register set description: Description of the excise registers set.
Partial CENVAT Credit: Indicates that the excise registration ID is allowed to credit only a portion of its input excise duty to its CENVAT account
Dependencies - When you post a goods receipt, the system splits the input excise duty on the material into its deductible and nondeductible amounts. It posts the deductible duty to the appropriate CENVAT account, and adds the nondeductible duty to the material value.
This information is also shown when you post the vendor's excise invoice.
Maintain Company Code Settings.
In this IMG activity, you maintain the data relating to your company codes.
In this IMG activity, you maintain the data relating to your company codes.
Document Type for CENVAT Postings.
It controls, which document type the system uses when making CENVAT postings in Financial Accounting (FI). Here ED is document type for cenvat posting.
It controls, which document type the system uses when making CENVAT postings in Financial Accounting (FI). Here ED is document type for cenvat posting.
Indicator for providing debit account overwriting
Debit Account Overwrite Indicator. X - Indicates debit accounts can be overwritten. Use In excise journal voucher transaction. It provides the flexibility to the user to enter the debit account of his choice depending on the nature of transaction.
Debit Account Overwrite Indicator. X - Indicates debit accounts can be overwritten. Use In excise journal voucher transaction. It provides the flexibility to the user to enter the debit account of his choice depending on the nature of transaction.
Automatic balance Indicator - Excise year start month. The calendar month marking the beginning of the excise year. This start month represents the month for the start of the excise invoice number range. The month 04 is entered here indicating April of the calendar year as the start month for excise invoices. Any change by the Excise authorities regarding start month should be taken care of by an entry in this field and initialization.
Excise invoice selection procedure :Excise invoice selection type. To indicate the method opted by the company for selecting the excise invoice. It can be either earliest or latest invoices that were received. Number of excise invoices to be selected Indicates the number of excise invoices that needs to be selected in the excise invoice selection.
Days to be considered for excise invoice selection Number of days from document date for excise invoice selection.
Example - If the value of this field is 20 and today is 28-03-97. The excise invoice selection will show the related invoices only for the period 08-03-97 to 28-03-97.
Example - If the value of this field is 20 and today is 28-03-97. The excise invoice selection will show the related invoices only for the period 08-03-97 to 28-03-97.
Document type for TDS FI posting: Financial accounting document type for TDS posting.
Document type for FI posting on Utilisation Financial accounting document type for TDS posting.
Indicator for item level excise duty round off - This indicator is to be used for deciding whether Item level excise
duty amount rounding off is required during procurement cycle. If marked 'X' then the excise duty amount will be rounded off to the nearest rupee at the Purchase order level. This will not round off the CENVAT credit to be taken. If the duty amount is less than one rupee then no rounding is done
duty amount rounding off is required during procurement cycle. If marked 'X' then the excise duty amount will be rounded off to the nearest rupee at the Purchase order level. This will not round off the CENVAT credit to be taken. If the duty amount is less than one rupee then no rounding is done
Rounding off of Excise duty for outgoing excise invoice - You can round off the Excise amount to be paid during an outgoing
Excise invoice by marking this indicator as 'X'. The rounding is done at the item level for each item where the amount is greater than 1 Rupee.
Excise invoice by marking this indicator as 'X'. The rounding is done at the item level for each item where the amount is greater than 1 Rupee.
Immediate Credit on Capital Goods - Instructs the system, when you verify a goods receipt for capital goods, to immediately post half of the input excise duty to the appropriate CENVAT accounts. The rest is posted the CENVAT on hold account, for use in the following year.
CVD Clearing Account - Specifies which G/L account the system credits when you take a CENVAT credit on countervailing duty in the Incoming Excise Invoices transaction.
Exchange rate type - Key representing a type of exchange rate in the system.
- You enter the exchange rate type to store different exchange rates. Example - You can use the exchange rate type to define a buying rate, selling rate, or average rate for translating foreign currency amounts. You can use the average rate for the currency translation, and the bank buying and selling rates for valuation of foreign currency amounts.
- You enter the exchange rate type to store different exchange rates. Example - You can use the exchange rate type to define a buying rate, selling rate, or average rate for translating foreign currency amounts. You can use the average rate for the currency translation, and the bank buying and selling rates for valuation of foreign currency amounts.
Exchange rate type to be used for Export excise duty converts - When you are creating an Excise invoice for export sales then the exchange rate for duty calculation will be picked up using this Exchange rate type.
Maintain Plant Settings - In this IMG activity, you maintain excise information relating to your plants.
Plant Settings - In this activity, you maintain excise information relating to your plants.
For each plant:
- Specify whether it is a manufacturing site or a depot.
- Assign it an excise registration ID. - You can assign the same ID to more than one plant, if required.
Plant Settings - In this activity, you maintain excise information relating to your plants.
For each plant:
- Specify whether it is a manufacturing site or a depot.
- Assign it an excise registration ID. - You can assign the same ID to more than one plant, if required.
Depot - Indicates that the plant in question is a depot. - Depots are required to prepare register RG 23D, and follow different procedures for goods receipt and invoice generation.
- Number of goods receipt per excise invoice.
- Multiple GR for one excise invoice, Single credit
- Multiple GR for one excise invoice, multiple credit
- Number of goods receipt per excise invoice.
- Multiple GR for one excise invoice, Single credit
- Multiple GR for one excise invoice, multiple credit
Maintain Excise Groups - In this IMG activity, you define your excise groups. For each excise group, you can also control how various excise invoice transactions will work.
Excise Groups - In this activity, you define excise groups. An excise group allows you to maintain a separate set of excise registers and excise accounts. The RG 23A, RG 23C and PLA serial numbers are created for an excise group.
Recommendation - Under normal circumstances, excise authorities require every business to maintain only one set of excise registers and one set of accounts. But through exemption from the authorities, multiple books can be maintained.
If your company has only one set of excise registers, then you need to maintain only one excise group.
1. Create one excise group for each set of registers that you need to keep.
2. Assign the excise groups to plants.
3. Maintain whether this Excise group is for a depot or not.
If you receive only one consignment for an Excise challan then you can leave GR's per EI as blank. If you receive multiple GR's for a given Excise challan and would like to avail multiple credit mark the GRs per EI as 'Multiple GR's for one excise invoice, multiple credit'. Alternatively if you want to availa the credit only after all the goods receipts have been made mark it as ' Multiple GR for one excise invoice, single credit'.
4. If you want to automatically create Excise invoice during Sales cycle at the time of billing the tick the indicator 'Create EI'
5. During depot sales if you do not want to do RG23D selection and posting separately and would like to complete RG23D selection in one step mark the indicator 'RG23D Auto post'. This will post the selected records into RG23D automatically. You cannot cancel the selection later.
6. If the indicator 'Default GR qty' is marked system will default the Excise challan quantity on to the Goods receipt if the Excise invoice number is given in the pop-up.
7. If the indicator 'Folio no create' is marked system will generate Folio numbers for RG23D during receipt of excise invoice into depot.
8. 'Automatic posting' when ticked will post the Excise invoice other movements automatically along with creation in single step.
9. 'Create Part1 for Block Stock' when marked will create a Part1 during the receipt of material into Blocked stock .
10. 'Create Part1 for STO' when marked will create a Part1 during the receipt of material through inter plant transfers.
11. 'Create Part1 for consumption stock' when marked will create a Part1 during the receipt of material into consumption stock. Excise Group Governs which set of excise registers a business transaction will be included in.
Following is the relation between excise group, plant and registration. - In define excise groups in Customizing.
Then, in transactions involving excise duty, for example, when you post a vendor's excise invoice, you specify which excise group you are using. This information tells the system which G/L accounts to post the excise to. At the end of the period, when you come to prepare your excise registers, you create different sets for each excise group.
Then, in transactions involving excise duty, for example, when you post a vendor's excise invoice, you specify which excise group you are using. This information tells the system which G/L accounts to post the excise to. At the end of the period, when you come to prepare your excise registers, you create different sets for each excise group.
Indicates that the plant in question is a depot. - Depots are required to prepare register RG 23D, and follow different procedures for goods receipt and invoice generation.
- GR Per Excise Invoice
- Multiple GR for one excise invoice , Multiple credit
- Multiple GR for one excise invoice , Single Credit
- GR Per Excise Invoice
- Multiple GR for one excise invoice , Multiple credit
- Multiple GR for one excise invoice , Single Credit
Create Excise Invoice Automatically - Instructs the system to automatically create a Sales and Distribution (SD) excise invoice immediately you create a commercial invoice or a pro forma invoice.
The excise invoice is created in the background. - If you want to make use of this function, you must also define the
default plant, excise group, and series groups in Customizing for Sales and Distribution (SD), by choosing Excise Group - Series Group Determination.
The excise invoice is created in the background. - If you want to make use of this function, you must also define the
default plant, excise group, and series groups in Customizing for Sales and Distribution (SD), by choosing Excise Group - Series Group Determination.
RG23D Sales Creation and posting option - RG23D Automatic Option if selected will create Depot excise invoice by posting the selection of excise invoices in single step. If this is not selected then you need to separately do RG23D selection
followed by PGI and then RG23D verification and posting. If you need automatic posting of RG23D selection then the Post Goods Issue should have been completed before running RG23D selection.
followed by PGI and then RG23D verification and posting. If you need automatic posting of RG23D selection then the Post Goods Issue should have been completed before running RG23D selection.
Default excise qty in GR - If this indicator is ticked then while doing Goods Receipt using 'MB01' system will default the excise invoice quantity on to the Goods receipt document.
Folio number for depo Posting - If this indicator is marked then while creating Excise invoice for other movements system automatically does the Verify and Post. You need not separately Post the excise invoice
Also we can set indicator for creation of part 1 for:
- Blocked stock
- Stock transport order
- Consignment stock
- Blocked stock
- Stock transport order
- Consignment stock
Maintain Series Group - In this IMG activity, you define the different excise series groups within your company. Series groups allow you to maintain multiple number ranges for the outgoing excise documents. Based on excise regulations and exemptions from the authorities you can maintain multiple number series for outgoing documents. But each of these series has to be declared to the excise authorities.
- Define excise series groups based on type of outgoing document
- Assign series group to excise registration ID
- If no financial postings are required for an Excise invoice in this seris group then you tick the 'No utilization' indicator.
- If the CENVAT has to be paid immediately and you need not wait for the Fort nightly payment then mark the 'Immediate Utilization' Iindicator. Example - You could define two series groups, group 001 for excise invoices, and group 002 for 57 F4 documents.
- No account postings for CENVAT in sales cycle
- No utilization Flag
If you do not need any CENVAT utilization for an excise invoice but would like to just generate an excise invoice then you need to mark this indicator.
If the flag is checked then system will create an Excise invoice in the given Series group but there will not be any account postings or Part2 postings.
Immediate Utilization of CENVAT - Specifies that when you create an excise invoice, the system immediately pays the amount from CENVAT and creates the Part II entry. Such invoices will not be listed for fortnightly utilization.
If you have both fortnightly and immediate utilization for the same excise group, the account determination within CIN IMG should point to the ED interim account.
Account determination for immediate payment will be done exactly the same as being done for fortnightly utilization program.
Maintain Excise Duty Indicators - In this IMG activity, you maintain the excise duty indicators.
IMG > Logistics - General > Tax On Goods Movement > India > Basic Settings > Determination of Excise Duty > Select Tax Calculation Procedure
IMG > Logistics - General > Tax On Goods Movement > India > Basic Settings > Determination of Excise Duty > Select Tax Calculation Procedure
In this IMG activity, you specify which tax procedure you want to use for determining excise duties and sales taxes on input materials in India.
- If you use condition-based excise determination, use a copy of the tax procedure TAXINN.
- If you use formula-based excise determination, use a copy of the tax procedure TAXINJ.
This tax procedure also supports condition-based excise determination, so that you can work with both concurrently.
We strongly recommend that new customers use condition-based excise determination. Note that once you have started using a tax procedure, you cannot switch to another one, otherwise you will not be able to display old documents.
Maintain Excise Defaults - In this IMG activity, you define which tax procedure and pricing condition types are used in calculating excise taxes using formula-based excise determination.
If you use condition-based excise determination, fill out the CVD cond. field and leave all the others blank.
If you use formula-based excise determination, fill out all of the fields as follows:
- Enter the tax procedure and the pricing conditions that are relevant for excise tax processing.
- Specify the purchasing and sales conditions types used for basic excise duty, additional excise duty, special excise duty, and cess.
- Specify the conditions in the sales order that are used for excise rates.
- Specify the countervailing duty condition type used for import purchase orders.
See also : SAP Library -> Logistics -> Country Versions -> Asia-Pacific -> India -> Materials Management (MM) -> Condition-Based Excise Determination and -> Formula-Based Excise Determination.
IMG > Logistics - General > Tax On Goods Movement > India > Basic Settings > Determination of Excise Duty >
Condition-Based Excise Determination
Condition-Based Excise Determination
When you enter a purchasing document, for example, a purchase order, the R/3 System automatically calculates the applicable excise duties using the condition technique.
Features : The standard system comes with two tax calculation procedures. TAXINN is only supports condition-based excise determination, whereas TAXINJ supports condition-based excise determination and formula-based excise determination. Both tax procedures contain condition types that cover all of the excise duties and sales taxes applicable.
Since the exact rates of excise duty can vary on a large number of factors, such as which vendor you purchase a material from, or which chapter ID the vendor stocks the material under, you create condition records for every sort of excise duty.
When you come to enter a purchasing document, the system applies the excise duty at the rates you have entered in the condition records.
Customizing : Make the settings in Customizing Basic -> India -> for Logistics – General, by choosing Taxes on Goods Movements Account -> Excise Duties Using Condition Technique and …-> Settings Determination.
These activities include one activity where you define a tax code for condition-based excise determination.
Master Data - Create condition records for all excise duties that apply, and enter the tax code for condition-based excise determination in each.
Day-to-Day Activities - When you enter a purchase order or other purchasing document, enter the tax code for condition-based excise determination in each line item. The system then calculates the excise duties using the condition records you have created.
When the ordered materials arrive, you post the goods receipt and the excise invoice. The system posts the excise duty to the appropriate accounts for deductible input taxes when you enter the excise invoice.
Creating Condition Records for Excise Duty
1. In the command field, enter FV11 and choose .
2. Enter the condition type that you want to create a condition record for and choose .
The Key Combination dialog box appears.
3. Select the combination of objects that you want to create the condition record for. On the dialog box, Control Code means "chapter ID." So, for example, to create a condition record for a tax that applies to a combination of country, plant, and chapter ID, select Country/Plant/Control Code.
4. Choose .
5. Enter data as required. - In the Tax Code field, enter the dummy tax code that you have defined.
6. Save the condition record.
Formula-Based Excise Determination - When you execute a business transaction involving materials that are subject to excise duty, the system automatically calculates the duty for you.
In order for the system to be able to determine which rate of excise duty to apply, you must have maintained all the data on the Excise Rate Maintenance screen, which you can Master Data®access from the SAP Easy Access screen by choosing Indirect Taxes Excise Rate Maintenance.
You maintain the following types of data:
- Plant master data
You assign each of your plants an excise duty indicator. You can use the same indicator for all the plants with the same excise status from a legal point of view, such as all those that are in an exempt zone. See also the information about manufacturers that are only entitled to deduct a certain portion of the duty (see Partial CENVAT Credit).
- Vendor master data
For each of your vendors with the same excise status from a legal perspective, you define an excise duty indicator. You must also specify the vendor type – for example, whether the vendor is a manufacturer, a depot, or a first-stage dealer. You must also stipulate if the vendor qualifies as a small-scale industry. For each permutation of plant indicator and vendor indicator, you then create a final excise duty indicator.
- Customer master data
Similarly, you assign the same excise duty indicator to each of your customers that share the same legal excise status.
Again, for each permutation of plant indicator and customer indicator, you then create a final excise duty indicator.
- Material master data
Each material is assigned a chapter ID.
- Excise tax rate
For every chapter ID and final excise duty indicator, you maintain the rate of excise duty.
If your business only qualifies for partial CENVAT credit, you must customize your system accordingly.
Let us consider an example to illustrate how the system determines which rate of excise duty to apply to a material. Assume you are posting a sale of ball bearings to a customer. The system automatically determines the rate of excise duty as follows:
1. Looks up the customer master data to see what status you have assigned the customer.
Let's assume you've assigned the customer status 3.
2. Looks up the plant master data to see what status you have assigned the plant. Similarly, your plant has status 2.
3. The system looks up the table under Excise Indicator for Plant and Customer to see what the final excise duty indicator is for customer status 3 and plant status 2: It is 7.
4. The system determines the chapter ID of the ball bearing for the plant.
Let’s assume the chapter ID at plant for the ball bearings is 1000.01.
5. Finally, the system looks up the table under Excise Tax Rate to see what rate of duty applies to chapter ID 1000.01 under
status 7.
Define Tax Code for Purchasing Documents - In this IMG activity, you define a tax code for the purposes of calculating excise duty when you enter purchasing documents. Only carry out this activity if you use condition-based excise
determination.
- Create a new tax code, and set the tax code type to V (input tax). Do not make any other settings for it.
- Assign Tax Code to Company Codes
determination.
- Create a new tax code, and set the tax code type to V (input tax). Do not make any other settings for it.
- Assign Tax Code to Company Codes
In this IMG activity, assign the tax code for purchasing documents to the company codes where it will be used.
Only carry out this activity if you use condition-based excise determination.
Only carry out this activity if you use condition-based excise determination.
Classify Condition Types - In this IMG activity, you specify which condition types you use for which sort of tax. Note that this only applies to condition types that you use with the new excise determination method. The system uses this information when you create a document from another one. For example, when you enter an incoming excise invoice from a
purchase order, or when you create an outgoing excise invoice from a sales order, the system determines the various excise duties in the excise invoice using the information that you have entered here. In addition, when you create a purchasing document, the system only uses the condition types that you enter here.
- For taxes on purchases, use the condition types contained in the tax procedure.
- For taxes on sales, use the condition types contained in the pricing procedures.
The standard system comes with sample settings for the tax calculation procedures and pricing procedures.
Use these settings as a basis for your own.
IMG > Logistics - General > Tax On Goods Movement > India > Account Determination
Use these settings as a basis for your own.
IMG > Logistics - General > Tax On Goods Movement > India > Account Determination
Define G/L Accounts for Taxes - In this IMG activity, you specify which G/L accounts you will use to record which taxes.
Requirements - You have set up G/L accounts for each of the processing keys listed below.
- Assign an account to each of the following posting keys. The accounts for VS1, VS2, and VS3 are used as clearing accounts during excise invoice verification.
- VS1 (basic excise duty)
- VS2 (additional excise duty)
- VS3 (special excise duty)
- VS5 (sales tax setoff)
- MWS (central sales tax)
- MW3 (local sales tax)
- ESA (service tax)
- ESE (service tax expense)
Specify Excise Accounts per Excise Transaction - In this IMG activity, you specify which excise accounts (for excise
duty and CENVAT) are to be posted to for the various transaction types. Enter all the accounts that are affected by each transaction type. If you use sub transaction types, enter the accounts for each sub transaction type as well.
duty and CENVAT) are to be posted to for the various transaction types. Enter all the accounts that are affected by each transaction type. If you use sub transaction types, enter the accounts for each sub transaction type as well.
Transaction type UTLZ is used for determining accounts only while posting excise JVs and also if the payment of excise duty has to be done fortnightly. The fortnightly CENVAT payment utility picks up the credit side accounts from the transaction types of GRPO, EWPO, and TR6C for determining the CENVAT and PLA accounts. There is no separate transaction type for fortnightly payment.
Example:
- Excise TT DC ind Account name
- GRPO CR CENVAT clearing account
- GRPO CR RG 23 BED account
- GRPO DR CENVAT on hld account
Example:
- Excise TT DC ind Account name
- GRPO CR CENVAT clearing account
- GRPO CR RG 23 BED account
- GRPO DR CENVAT on hld account
Specify G/L Accounts per Excise Transaction - In this IMG activity, you assign the excise and CENVAT accounts to G/L
accounts. When you come to execute the various transactions, the system determines which G/L accounts to post to by looking at the:
- Excise group
- Company code
- Chart of accounts
accounts. When you come to execute the various transactions, the system determines which G/L accounts to post to by looking at the:
- Excise group
- Company code
- Chart of accounts
Furthermore, if you want separate account determination settings within an excise group, you can also use sub transaction types.
Requirements
You have already:
- Defined the G/L accounts
- Defined the excise groups
- Maintained the transaction accounts
Activities - For each excise group, assign the excise and CENVAT accounts to G/L accounts. For most businesses, one set of accounts will suffice for all transactions.
Note : you need not remit the CENVAT to the excise department immediately, so maintain the credit account for transaction type DLFC as an excise duty interim account. This will be set off when you remit the duty. Config setting needed to be done in order to get the Excise Details Screen in Material Master.
Even though this functionality is available in enterprise version, a small configuration step has to be made in Screen Sequences for Material Master.
Following document helps you to do this configuration.
- Material Master à Logistics General
1. Go to IMG Define Structure of Data Screen for each Configuring the Material master Screen Sequence.
2. Select your screen sequence. Usually it would be 21. Select the same and click on Data Screen in the left frame.
3. Once the data screens are exhibited, select data screen no. 15, ie. SSq. 21and Scrn 15, which is “Foreign Trade: Import Data”. Select the same and click on Sub screens in the left frame.
4. Go to the last sub screen i.e. 21-15-6 - SAPLMGD1- 0001 and select the same. Click on tab view sub screen and ensure that the sub screen is blank.
5. Now in the last sub screen i.e. no.6 you delete SAPLMGD1 – 0001 and instead add SAPLJ1I_MATERIAL_MASTER and in the screen no. 2205.
6. Save the setting.
7. Create a Material Master and check whether in Screen Foreign Trade- Material Master à Logistics General
1. Go to IMG Define Structure of Data Screen for each Configuring the Material master Screen Sequence.
2. Select your screen sequence. Usually it would be 21. Select the same and click on Data Screen in the left frame.
3. Once the data screens are exhibited, select data screen no. 15, ie. SSq. 21and Scrn 15, which is “Foreign Trade: Import Data”. Select the same and click on Sub screens in the left frame.
4. Go to the last sub screen i.e. 21-15-6 - SAPLMGD1- 0001 and select the same. Click on tab view sub screen and ensure that the sub screen is blank.
5. Now in the last sub screen i.e. no.6 you delete SAPLMGD1 – 0001 and instead add SAPLJ1I_MATERIAL_MASTER and in the screen no. 2205.
6. Save the setting.
Files and Links
Sales (SD-SLS)
Sales and Distribution (SD)
Roles in Sales and Distribution (SD)
Sales and Distribution
Sales and Distribution (SD) Workflow Scenarios
Sales and Operations Planning (LO-LIS-PLN)
Sales Employee (PA-PA)
Sales Support: Computer-Aided Selling (CAS)
Reports and Analyses (SD)
Pricing and Conditions
This comment has been removed by the author.
ReplyDeleteuseful.
ReplyDeleteThis comment has been removed by the author.
ReplyDelete